服务器管理
- Docker
- Linux
- nginx配置
- python flask项目部署到服务器上,并制作docker镜像
- Rustdesk中继服务器Docker安装
- ubuntu+Windows双系统默认引导顺序
- tailscale 自建服务器
- tailscale客户端连接headscale
- wireguard配置
- 使用 Certbot 获取免费 HTTPS 证书
- NAS
- Windows 设置 Syncthing 开机自启动
- Windows 设置 Syncthing 开机自启动
- iStoreOS配置tailscale——局域网访问和科学上网
- 群晖安装 WireGuard(客户端Client)教程
- 群晖docker-compose安装paperless文档归档管理系统
- docker安装个人在线书库calibre
- python及pip安装
- nginx反向代理emqx
- 群晖 VSCode Remote 配置
- 群晖mail server配置邮箱服务器(通过阿里云中继)
- openwrt 如何正确设置ksmbd
- 路由器
- 管理工具
Docker
docker部署相关
Linux
nginx配置
配置文件nginx.zip
引言
嗨,朋友们!今天我们要聊的主角,是 Web 服务器界的一颗璀璨明星 —— Nginx。如果你对这个名字不陌生,那肯定知道它有多厉害。全球超过三分之一的网站,包括 Netflix、Pinterest、Airbnb 这些流量巨兽,背后都有 Nginx 在默默支撑着。它就像一个轻量级的、高性能的“网站大管家”,既能当 Web 服务器,又能做反向代理,效率高到让你尖叫。
这次,我打算手把手教你如何在 Ubuntu 22.04、24.04 乃至最新的 25.04 系统上安装和配置 Nginx。别担心,这不仅仅是简单的安装步骤,我们会一起把防火墙设置、安全加固、性能优化,甚至一些常见问题的排查都搞定。跟着我,你会发现搭建一个高性能、安全的 Web 服务器,其实没那么难!
Nginx:你的网站的“门面”和“大管家”
在开始动手之前,我们先来快速看看通过这篇教程,你究竟能收获些什么“硬货”:
- 轻松安装与部署:学会从 Ubuntu 官方软件源安装 Nginx,配置
UFW防火墙规则,并验证安装是否成功。 - 服务管理得心应手:掌握
systemd命令,让你对 Nginx 服务的启停、重载、开机自启等操作了如指掌。 - 多站点托管秘籍:通过配置
Server Blocks(Nginx 版的虚拟主机),在一台服务器上轻松托管多个域名。 - 安全防护升级:应用一系列安全最佳实践,包括
SSL/TLS证书(如Let's Encrypt)、安全响应头、请求限速以及访问控制。 - 性能调优专家:学会调整
worker processes、connection limits、缓存和Gzip压缩,让你的网站飞沙走石,速度爆表。 - 反向代理与负载均衡:了解如何将 Nginx 设置为后端应用的
Reverse Proxy,甚至实现简单的负载均衡。 - 故障排除与日志分析:学会查看
access和error logs,诊断常见问题,迅速定位并解决故障。 - 版本兼容性洞察:理解 Ubuntu 22.04、24.04 和 25.04 在部署 Nginx 时的主要区别。
- 日常维护与监控:建立备份机制,实施监控,并通过定期更新来保持服务器的健康状态。
- 生产环境准备:最终目标是部署一个安全、优化且配置良好的 Nginx 服务器,能够从容应对生产环境的挑战!
是不是很期待?好啦,话不多说,我们这就开始吧!
部署前的小准备
在正式开始 Nginx 的安装和配置之前,我们需要做一些基础准备工作,确保一切顺利进行。
你得准备好:
- 一台 Ubuntu 服务器:可以是 Ubuntu 22.04 LTS、24.04 LTS 或者 25.04 的任意一台。如果你还没准备好,可以参考 DigitalOcean 的 Ubuntu 服务器初始设置指南。
- 一个非 root 用户:并且这个用户拥有
sudo权限。为了服务器的安全,我们通常不直接使用root用户进行日常操作。如果还没有,可以跟着 如何在 Ubuntu 上创建具有 sudo 权限的用户 这篇教程来搞定。 - 一个域名(可选):如果你想配置
Server Blocks或者SSL证书,那就需要一个域名。如果你用的是 DigitalOcean,可以看看 DigitalOcean DNS 简介 来了解如何设置。 - 基础的命令行操作知识:知道怎么在终端里敲命令就行,不用特别精通。
都准备好了吗?那就用你的非 root 用户登录服务器,我们开始折腾!
Ubuntu 版本兼容性一览
不同版本的 Ubuntu 会自带不同版本的 Nginx,虽然安装方法基本一致,但了解一下版本差异还是有好处的:
| Ubuntu 版本 | Nginx 版本 | 支持状态 | 备注 |
|---|---|---|---|
| Ubuntu 22.04 LTS | 1.18.0+ | 完全支持 | 长期支持,直至 2027 年 |
| Ubuntu 24.04 LTS | 1.24.0+ | 完全支持 | 最新 LTS 版本,增强了安全性 |
| Ubuntu 25.04 | 1.26.0+ | 完全支持 | 最新特性和性能改进,更适合尝鲜 |
第一步:安装 Nginx —— 轻松搞定!
Nginx 在所有受支持的 Ubuntu 版本中都可以通过默认的软件源获取。我们将使用 apt 包管理系统来安装最新的稳定版本。
更新你的系统
在安装任何新软件之前,老规矩,先更新一下你的本地包索引和所有已安装的软件包,确保我们获取到的是最新、最稳定的版本:
sudo apt update
sudo apt upgrade -y
apt update 会刷新本地的包列表,而 apt upgrade -y 则会升级所有可升级的软件包,-y 参数是自动确认,省得你每次都按 Y。
安装 Nginx
现在,激动人心的时刻到了!用下面这行命令就能安装 Nginx:
sudo apt install nginx -y
如果系统提示你确认安装,直接敲 Y 回车就好。如果还问你是否要重启某些服务,也直接敲 Enter 接受默认设置即可。apt 会自动帮你安装 Nginx 及其所有必要的依赖项。
验证安装是否成功
安装完成后,我们可以快速检查一下 Nginx 的版本,确保安装没问题:
nginx -v
你应该会看到类似这样的输出,这表示 Nginx 已经成功安装:
nginx version: nginx/1.24.0 (Ubuntu)
Copy
检查 Nginx 服务状态
Nginx 安装完成后,Ubuntu 通常会自动启动它。为了确认 Nginx 服务已经在后台正常运行,我们可以使用 systemd 这个初始化系统来检查:
systemctl status nginx
如果一切正常,你会看到类似这样的输出,其中 Active: active (running) 最为关键,它表明 Nginx 正在愉快地运行着:
● nginx.service - A high performance web server and a reverse proxy server
   Loaded: loaded (/lib/systemd/system/nginx.service; enabled; vendor preset: enabled)
   Active: active (running) since Fri 2022-03-01 16:08:19 UTC; 3 days ago
     Docs: man:nginx(8)
 Main PID: 2369 (nginx)
    Tasks: 2 (limit: 1153)
   Memory: 3.5M
   CGroup: /system.slice/nginx.service
           ├─2369 nginx: master process /usr/sbin/nginx -g daemon on; master_process on;
           └─2380 nginx: worker process
虽然 systemctl 已经告诉我们服务启动成功了,但最直接的验证方法是亲自从浏览器访问 Nginx 的默认页面。
如果你不确定服务器的公网 IP 地址,可以用 icanhazip.com 这个小工具快速获取:
curl -4 icanhazip.com
拿到你的服务器 IP 地址后,把它输入到你的浏览器地址栏:
http://你的服务器_IP
如果一切顺利,你将会看到 Nginx 的默认欢迎页面,通常长这样:
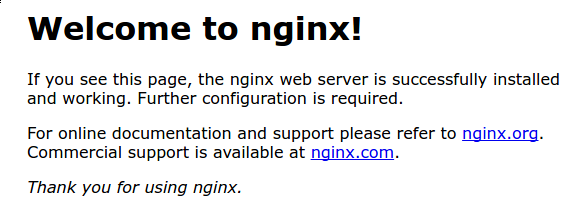
恭喜你!看到这个页面,就说明你的 Web 服务器已经成功启动并可以正常访问了。
第二步:防火墙 UFW 设置 —— 安全第一!
在让 Nginx 对外提供服务之前,防火墙是必须配置的“门卫”。想象一下,你的服务器就像一个家,防火墙就是大门。我们得告诉它,哪些人可以进来,哪些端口可以被访问。好在 Nginx 在安装时很贴心地在 ufw 中注册了自己,让我们的配置变得非常简单。
首先,我们来看看 ufw 知道哪些应用配置:
sudo ufw app list
你会看到类似这样的应用配置文件列表:
Available applications:
  Nginx Full
  Nginx HTTP
  Nginx HTTPS
  OpenSSH
这里有三个 Nginx 相关的配置文件:
- Nginx Full:这个配置文件会同时打开 80 端口(用于普通的未加密 HTTP 网页流量)和 443 端口(用于
TLS/SSL加密的 HTTPS 流量)。 - Nginx HTTP:这个配置文件只打开 80 端口(用于普通的未加密 HTTP 网页流量)。
- Nginx HTTPS:这个配置文件只打开 443 端口(用于
TLS/SSL加密的 HTTPS 流量)。 - OpenSSH: 这个是 SSH 服务,用来远程登录你的服务器。友情提示:在配置防火墙时,一定要记得允许
OpenSSH,否则你可能会被自己锁在服务器外面!
通常,我们建议你启用最严格的防火墙配置文件,只允许你实际需要的流量通过。现在,我们只需要允许 HTTP 流量(80 端口),所以选择 Nginx HTTP 就够了。
启用它:
sudo ufw allow 'Nginx HTTP'
# 别忘了,如果你之前没有允许过 OpenSSH,现在也把它加上!
sudo ufw allow 'OpenSSH'
你现在可以验证防火墙规则是否已生效:
sudo ufw status
输出会显示哪些 HTTP 流量被允许了:
Status: active

To                         Action      From
--                         ------      ----
OpenSSH                    ALLOW       Anywhere
Nginx HTTP                 ALLOW       Anywhere
OpenSSH (v6)               ALLOW       Anywhere (v6)
Nginx HTTP (v6)            ALLOW       Anywhere (v6)
看到 Nginx HTTP 和 OpenSSH 都显示为 ALLOW 了吗?这意味着你的网站对外开放了 HTTP 访问,同时你还能通过 SSH 登录管理服务器,安全又方便!
第三步:检查你的 Web 服务器是否活蹦乱跳
虽然我们已经在第二步中验证了 Nginx 服务是否运行,但再用最直接的方式确认一下,总没错!
Nginx 安装完成后,Ubuntu 就会自动启动它,所以理论上,你的 Web 服务器现在应该已经处于运行状态了。
我们已经用 systemctl status nginx 确认过了服务的后台状态。现在,让我们直接通过浏览器访问你的服务器 IP 地址,看看 Nginx 的欢迎页面能不能正常显示。
如果你不确定服务器的公共 IP 地址,可以像之前一样,使用 curl -4 icanhazip.com 命令来获取。
拿到 IP 后,在你的浏览器地址栏输入:
http://你的_服务器_IP
Copy
比如 http://203.0.113.1。
如果一切顺利,你将再次看到 Nginx 默认的“Welcome to Nginx!”页面。这就像是 Nginx 在跟你打招呼,告诉你:“我准备好为你服务了!”
看到这个页面就说明 Nginx 已经成功部署,并且可以正常地通过互联网访问,随时准备好承载你的网站内容了。
第四步:管理 Nginx 进程 —— 随心所欲
现在你的 Web 服务器已经上线了,接下来学习一些基本的管理命令,让你能像驾驭一匹骏马一样,灵活控制 Nginx。这些命令主要通过 systemctl 来操作 systemd 服务管理系统。
停止你的 Web 服务器:
当你需要暂时关闭 Nginx 服务时,比如进行维护或者升级,可以使用这个命令:
sudo systemctl stop nginx
启动已停止的 Web 服务器:
当 Nginx 停止后,你需要重新启动它时:
sudo systemctl start nginx
停止后再启动服务(重启):
这是一个常用的命令,当你修改了 Nginx 的配置后,通常需要重启服务来应用这些改动。它会先停止服务,再重新启动:
sudo systemctl restart nginx
重新加载配置(不中断连接):
Nginx 最酷的功能之一是,当你只修改了配置文件(而不是 Nginx 本身的核心功能)时,它可以无缝重新加载配置,而不会中断现有的用户连接。这对于生产环境中的网站来说至关重要,用户根本感觉不到服务有任何中断!
sudo systemctl reload nginx
禁止 Nginx 开机自启:
默认情况下,Nginx 会被配置成在服务器启动时自动运行。如果你不希望它这样做,比如你只在特定时间运行服务,或者有其他启动顺序要求,可以禁用这个行为:
sudo systemctl disable nginx
重新启用 Nginx 开机自启:
如果你改变了主意,想让 Nginx 再次在开机时自动启动,可以重新启用服务:
sudo systemctl enable nginx
掌握了这些基本的管理命令,你就有了驾驭 Nginx 的能力。接下来,我们将学习如何配置 Server Blocks,让一台服务器承载多个网站!
第五步:配置 Server Blocks(虚拟主机)—— 一台服务器,多个网站!
想象一下,你的服务器就像一栋公寓楼,而 Server Blocks(在 Apache 中我们叫它虚拟主机 virtual hosts)就是这栋楼里的不同房间。每个房间都可以住进一个不同的“租客”(网站),拥有自己独立的配置和内容,但都共享同一栋楼的资源。
我们将以一个叫做 your_domain 的域名为例进行设置,但在实际操作中,你务必将其替换为你自己的真实域名。
在 Ubuntu 22.04 上,Nginx 默认会启用一个 Server Block,它的文档根目录在 /var/www/html。对于单个网站来说,这很方便。但如果你想托管多个网站,直接修改这个目录就会变得很混乱。所以,我们的策略是:保留 /var/www/html 作为默认的“备用”目录(当用户的请求不匹配任何其他网站时),然后为我们的 your_domain 网站在 /var/www 下创建一个新的、独立的目录结构。
1. 创建网站目录
首先,为你的域名创建一个目录结构,html 子目录是存放网站文件的标准位置。-p 参数会确保所有必要的父目录都被创建:
sudo mkdir -p /var/www/your_domain/html
2. 分配目录所有权
接下来,我们需要将这个新目录的所有权分配给你的当前用户($USER 环境变量代表你当前登录的用户名)。这样你就可以在不需要 sudo 的情况下,轻松地在其中创建、修改文件:
sudo chown -R $USER:$USER /var/www/your_domain/html
3. 设置目录权限
为了确保 Web 服务器能够读取文件,同时保证安全,我们需要设置合适的目录权限。755 权限意味着所有者拥有读、写、执行的完整权限,而用户组和其他人只有读和执行的权限。
sudo chmod -R 755 /var/www/your_domain
4. 创建示例 index.html 文件
现在,我们来为 your_domain 创建一个简单的 index.html 页面。你可以用 nano 或你喜欢的任何文本编辑器:
nano /var/www/your_domain/html/index.html
在文件中添加以下 HTML 内容。别忘了把 your_domain 替换成你的实际域名:
<!DOCTYPE html>
<html>
    <head>
        <title>欢迎来到 your_domain!</title>
    </head>
    <body>
        <h1>恭喜! your_domain 的 Server Block 运行成功!</h1>
        <p>这是你的自定义网站页面。</p>
    </body>
</html>
保存并关闭文件。在 nano 中,按 Ctrl+X,然后按 Y 确认保存,最后按 Enter。
5. 创建新的 Server Block 配置文件
为了让 Nginx 知道如何处理 your_domain 的请求,我们需要创建一个专门的 Server Block 配置文件。我们不会直接修改默认配置,而是在 /etc/nginx/sites-available/ 目录下创建新文件:
sudo nano /etc/nginx/sites-available/your_domain
粘贴以下配置代码块。这个配置与默认的类似,但我们更新了 root 目录和 server_name:
server {
        listen 80;
        listen [::]:80;

        root /var/www/your_domain/html;
        index index.html index.htm index.nginx-debian.html;

        server_name your_domain www.your_domain;

        location / {
                try_files $uri $uri/ =404;
        }
}
这里简单解释一下:
listen 80;:Nginx 监听 80 端口,处理 HTTP 请求。listen [::]:80;确保也监听 IPv6 地址。root /var/www/your_domain/html;:指定网站文件的根目录。index index.html ...;:定义当访问目录时,Nginx 尝试加载的文件名顺序。server_name your_domain www.your_domain;:指定这个Server Block会响应哪些域名请求。location / {}:定义了请求如何路由。try_files $uri $uri/ =404;表示 Nginx 会尝试查找与URI匹配的文件,如果没有找到文件就查找目录,如果都找不到,则返回 404 错误。
6. 启用 Server Block
现在,我们的新 Server Block 配置文件还在 sites-available 目录里,Nginx 默认不会读取它。我们需要通过创建一个符号链接(symlink),把它“链接”到 sites-enabled 目录,Nginx 在启动时会读取这个目录下的所有配置文件:
sudo ln -s /etc/nginx/sites-available/your_domain /etc/nginx/sites-enabled/
小贴士:符号链接就像是文件系统里的“快捷方式”。这样做的好处是,你可以轻松地禁用一个
Server Block(只需删除sites-enabled里的链接),而不用删除原始的配置文件,以后想再启用时很方便。
现在,你的 Nginx 服务器上有了两个活跃的 Server Block:
your_domain:响应your_domain和www.your_domain的请求。default:如果任何请求不匹配your_domain的Server Block,它会由默认的Server Block来处理(通常是/var/www/html里的内容)。
7. 调整 nginx.conf 文件
为了避免潜在的 hash bucket memory 问题(当有大量 server_name 时可能出现),我们还需要稍微调整一下主配置文件 /etc/nginx/nginx.conf。
打开这个文件:
sudo nano /etc/nginx/nginx.conf
在 http { ... } 配置块内,找到 server_names_hash_bucket_size 这行。它可能被注释掉了(前面有一个 # 符号)。我们需要取消注释,并确保它的值是 64:
...
http {
    ...
    server_names_hash_bucket_size 64; # 移除前面的 # 号
    ...
}
...
小贴士:在配置文件中,用
#符号注释掉一行代码是禁用它的常见做法,同时也能作为文档说明。很多配置文件会预留一些注释掉的选项,方便用户根据需求启用或禁用。
保存并关闭文件。
8. 测试配置并重启 Nginx
在重启 Nginx 之前,强烈建议你先测试一下配置文件的语法是否正确,避免因为手误导致服务启动失败:
sudo nginx -t
如果没有任何语法错误,你会看到 syntax is ok 和 test is successful 的提示。如果出现错误,请仔细检查你刚才修改的文件。
测试通过后,重启 Nginx 服务,让新的 Server Block 生效:
sudo systemctl restart nginx
现在,Nginx 应该已经开始为你的域名提供服务了。打开你的浏览器,访问 http://your_domain(再次强调,替换成你的实际域名),你应该会看到你刚才创建的那个“恭喜!”页面。

是不是很酷?你已经成功在一台服务器上部署了你的第一个自定义网站!
第六步:安全加固与性能优化 —— 让你的网站又快又安全!
网站上线了,但我们不能止步于此。一个优秀的 Web 服务器不仅要能正常工作,更要又快又安全。这一步,我们将为 Nginx 进行一些生产环境级别的安全加固和性能优化。
基础安全配置
编辑 Nginx 的主配置文件:
sudo nano /etc/nginx/nginx.conf
在 http { ... } 配置块内,添加以下安全相关的指令。它们能有效提高服务器的安全性,抵御一些常见的攻击:
# 隐藏 Nginx 版本信息,避免暴露服务器软件版本给攻击者
server_tokens off;

# 添加安全响应头,防止常见的 Web 漏洞
# X-Frame-Options: 防止点击劫持 (Clickjacking) 攻击
add_header X-Frame-Options "SAMEORIGIN" always;
# X-XSS-Protection: 启用浏览器内置的 XSS 防护
add_header X-XSS-Protection "1; mode=block" always;
# X-Content-Type-Options: 防止 MIME 类型嗅探攻击
add_header X-Content-Type-Options "nosniff" always;
# Referrer-Policy: 控制浏览器发送 Referer 头的信息
add_header Referrer-Policy "no-referrer-when-downgrade" always;
# Content-Security-Policy: 内容安全策略,限制可加载的资源来源,大大减少 XSS 风险
add_header Content-Security-Policy "default-src 'self' http: https: data: blob: 'unsafe-inline'" always;

# 再次确认隐藏 Nginx 版本信息 (防止某些模块覆盖)
server_tokens off;

# 限制客户端请求体大小,防止恶意大文件上传导致服务器资源耗尽
client_max_body_size 10M; # 例如,限制为 10MB

# 超时设置,防止慢速攻击和资源占用
client_body_timeout 12s;    # 客户端发送请求体超时
client_header_timeout 12s;  # 客户端发送请求头超时
keepalive_timeout 15s;      # 长连接保持时间
send_timeout 10s;           # 服务器向客户端发送响应超时
性能优化秘籍
同样在 /etc/nginx/nginx.conf 文件中,添加以下性能优化配置。它们能帮助 Nginx 更高效地处理请求:
# Worker 进程数量 (根据你的 CPU 核心数进行调整)
# auto 表示 Nginx 会自动检测 CPU 核心数并设置相应数量的 worker 进程
worker_processes auto;

# Worker 连接设置
events {
    # 每个 worker 进程可以处理的最大并发连接数
    worker_connections 1024;
    # 使用高效的 I/O 多路复用机制,epoll 是 Linux 上的首选
    use epoll;
    # 允许 worker 进程一次性接受多个新连接
    multi_accept on;
}

# Gzip 压缩,显著减少传输数据量,加快页面加载速度
gzip on;
# 告诉代理服务器根据 Vary: Accept-Encoding 头来缓存压缩内容
gzip_vary on;
# 对所有代理请求的响应进行压缩
gzip_proxied any;
# 压缩级别,1(最低)到 9(最高),6 是一个很好的平衡点
gzip_comp_level 6;
# 定义哪些 MIME 类型的文件需要进行 Gzip 压缩
gzip_types
    text/plain
    text/css
    text/xml
    text/javascript
    application/json
    application/javascript
    application/xml+rss
    application/atom+xml
    image/svg+xml;
测试并应用配置
修改完配置文件后,老规矩,先测试语法,再重载 Nginx。
测试配置:
sudo nginx -t
如果测试通过,重载 Nginx:
sudo systemctl reload nginx
SSL/TLS 证书准备
为了让你的网站支持 HTTPS,并启用 Nginx HTTPS 防火墙规则,你需要安装 SSL/TLS 证书。Let's Encrypt 提供免费且自动化的证书。
安装 Certbot 工具:
Certbot 是一个可以自动为 Nginx 获取和配置 Let's Encrypt 证书的工具。
# 安装 Certbot 及其 Nginx 插件
sudo apt install certbot python3-certbot-nginx -y

# 检查 Certbot 是否正常工作
sudo certbot --version
看到 Certbot 的版本号,就说明工具安装成功了。下一步就是使用它来为你的域名生成和配置证书。
通过这些安全加固和性能优化,你的 Nginx 服务器现在不仅更安全,而且能提供更快的用户体验。棒极了!
第七步:Nginx 那些重要的文件和目录
既然你已经和 Nginx 混熟了,了解它的一些“内部构造”会让你在管理和排查问题时事半功倍。Nginx 在 Ubuntu 上有一些关键的目录和文件,就像是它的“说明书”和“日记本”。
内容文件
/var/www/html:这是 Nginx 默认的 Web 根目录。你之前看到的那个“Welcome to Nginx!”页面就存放在这里。当然,我们自己创建的Server Block会有自己的root目录,比如/var/www/your_domain/html。- 你自己的网站目录:例如
/var/www/your_domain/html,这里存放着你的网站的所有HTML、CSS、JavaScript和图片等文件。
服务器配置
/etc/nginx:这是 Nginx 的主配置目录,所有的 Nginx 配置文件都住在这里。/etc/nginx/nginx.conf:Nginx 的主配置文件。你可以在这里修改 Nginx 的全局配置,比如worker_processes、gzip设置、server_names_hash_bucket_size等。/etc/nginx/sites-available/:这个目录存放着所有可用的Server Blocks配置文件。你可以为每个网站创建一个独立的配置文件放在这里。Nginx 不会直接使用这些文件,除非它们被“链接”到sites-enabled目录。/etc/nginx/sites-enabled/:这个目录存放着所有已启用的Server Blocks配置文件。它们通常是通过符号链接指向sites-available目录下的文件。Nginx 在启动时会加载并执行这个目录中的所有配置。/etc/nginx/snippets:这个目录包含一些配置片段。如果你有一些重复出现的配置(比如SSL设置、安全响应头),可以把它们抽象成一个片段文件,然后在多个Server Blocks中引用,保持配置的整洁和可维护性。
服务器日志
/var/log/nginx/access.log:这是 Nginx 的访问日志。每一次用户对你网站的访问请求,无论成功与否,都会被记录在这个文件里。它包含了访问者的 IP、请求时间、请求方法、URL、状态码、响应大小等信息,是分析网站流量和用户行为的重要数据源。/var/log/nginx/error.log:这是 Nginx 的错误日志。任何 Nginx 自身运行时的错误、配置错误或者请求处理中的异常,都会被记录在这里。当你的网站出现问题时,查看这个日志文件是排查故障的第一步,它会告诉你发生了什么,在哪里发生了。
熟悉这些文件和目录,能让你在管理 Nginx 时更加得心应手,遇到问题也能快速找到线索,解决它们。
Nginx 安全小贴士:常见问题与实践
保障 Web 服务器的安全就像给你的网站穿上一层厚厚的盔甲。以下是一些 Nginx 安全加固的实践和常见问题,希望能帮到你:
Nginx 安全实践清单
| 安全实践 | 实现方式 | 常用命令/配置 | 优先级 |
|---|---|---|---|
| 保持 Nginx 更新 | 定期更新 Nginx 及系统软件包 | sudo apt update && sudo apt upgrade nginx |
高 |
| 配置防火墙 | 使用 UFW 限制只开放必要端口 |
sudo ufw allow 'Nginx Full' |
高 |
| 启用 SSL/TLS | 使用 Let's Encrypt 安装 SSL 证书 |
sudo certbot --nginx -d your_domain.com |
高 |
| 隐藏服务器信息 | 阻止 Nginx 版本泄露 | 在 /etc/nginx/nginx.conf 中添加 server_tokens off; |
中 |
| 安全响应头 | 添加安全响应头,防止常见攻击 | 在 server block 中添加(见下方示例) |
中 |
| 请求限速 | 配置 rate limiting,抵御 DDoS 和暴力破解攻击 |
配置 limit_req_zone 和 limit_req |
中 |
| 强认证 | 为管理界面使用强密码 | 实施 HTTP 基本认证或 OAuth |
中 |
| 定期备份 | 备份 Nginx 配置和网站内容 | sudo cp -r /etc/nginx /backup/nginx-$(date +%Y%m%d) |
中 |
| 访问控制 | 限制对敏感目录的访问 | 使用 deny all; 或 IP 白名单 |
低 |
| 日志监控 | 监控访问和错误日志,发现可疑活动 | sudo tail -f /var/log/nginx/error.log |
低 |
示例:安全响应头配置
为了进一步增强安全性,你可以在 Server Block 中添加这些响应头,它们可以有效防止一些常见的 Web 漏洞:
server {
    ...
    add_header X-Frame-Options "SAMEORIGIN" always;
    add_header X-XSS-Protection "1; mode=block" always;
    add_header X-Content-Type-Options "nosniff" always;
    add_header Referrer-Policy "no-referrer-when-downgrade" always;
    add_header Content-Security-Policy "default-src 'self' http: https: data: blob: 'unsafe-inline'" always;
    ...
}
示例:请求限速配置
请求限速是抵御 DDoS 攻击和暴力破解的有效手段。你可以在 http 块中定义一个限速区域,然后在 Server Block 或 location 块中应用它。
第一步:在 /etc/nginx/nginx.conf 的 http 块中定义限速区域:
http {
    ...
    # 定义一个名为 'one' 的限速区域,大小 10MB,每秒处理 1 个请求
    # $binary_remote_addr 用来识别客户端 IP 地址
    limit_req_zone $binary_remote_addr zone=one:10m rate=1r/s;
    ...
}
第二步:在你的 Server Block 或 location 块中应用这个限速区域:
server {
    ...
    # 对所有请求应用名为 'one' 的限速规则
    # burst=5 表示允许在短时间内突发 5 个请求,然后才开始限速
    # nodelay 表示不延迟处理突发请求,但超出突发限制的请求会被直接拒绝
    location / {
        limit_req zone=one burst=5 nodelay;
        try_files $uri $uri/ =404;
    }
    ...
}
常见问题 Q&A
我们整理了一些 Nginx 相关的常见问题,并提供了简明扼要的答案,希望对你有帮助。
1. 如何启动、停止和管理 Nginx 服务?
管理 Nginx 服务主要依赖 systemctl 命令:
# 启动 Nginx
sudo systemctl start nginx

# 停止 Nginx
sudo systemctl stop nginx

# 重启 Nginx (先停止再启动)
sudo systemctl restart nginx

# 重新加载配置 (不停止服务,不中断连接)
sudo systemctl reload nginx

# 设置 Nginx 开机自启
sudo systemctl enable nginx

# 禁用 Nginx 开机自启
sudo systemctl disable nginx
2. 怎么检查 Nginx 是否正在运行?
你可以通过多种方式确认 Nginx 的运行状态:
# 检查服务状态(最常用)
sudo systemctl status nginx

# 检查 Nginx 是否监听了端口(比如 80 或 443)
sudo netstat -tlnp | grep nginx

# 测试 Nginx 配置文件语法是否正确
sudo nginx -t

# 查看 Nginx 进程
ps aux | grep nginx
3. 如何为 Nginx 配置 UFW 防火墙?
UFW 为 Nginx 提供了三种预设的配置文件,你可以根据需求选择:
    # 只允许 HTTP 流量 (端口 80)
    sudo ufw allow 'Nginx HTTP'

    # 只允许 HTTPS 流量 (端口 443)
    sudo ufw allow 'Nginx HTTPS'

    # 同时允许 HTTP 和 HTTPS 流量
    sudo ufw allow 'Nginx Full'

    # 检查 UFW 防火墙状态
    sudo ufw status
4. Ubuntu 上 Nginx 的默认配置文件在哪?
- 主配置文件:
/etc/nginx/nginx.conf - 可用站点配置:
/etc/nginx/sites-available/(存放所有站点配置,待启用) - 已启用站点配置:
/etc/nginx/sites-enabled/(通过符号链接指向sites-available中的配置) - 默认站点配置:
/etc/nginx/sites-available/default(Nginx 默认的站点配置)
5. 如何将 Nginx 配置为反向代理?
在 /etc/nginx/sites-available/your-domain 站点配置中,你可以这样设置一个反向代理,将请求转发到本地的 3000 端口的后端应用:
    server {
        listen 80;
        server_name your-domain.com;

        location / {
            # 将请求转发到 http://localhost:3000
            proxy_pass http://localhost:3000;
            # 传递客户端的原始 Host 头
            proxy_set_header Host $host;
            # 传递客户端的真实 IP 地址
            proxy_set_header X-Real-IP $remote_addr;
            # 传递客户端请求的代理路径
            proxy_set_header X-Forwarded-For $proxy_add_x_forwarded_for;
            # 传递原始请求的协议 (HTTP 或 HTTPS)
            proxy_set_header X-Forwarded-Proto $scheme;
        }
    }
6. Nginx 报错了怎么办?
遇到 Nginx 错误时,可以按以下步骤排查:
    # 测试配置文件语法,通常能发现大部分配置问题
    sudo nginx -t

    # 查看 Nginx 错误日志,这是排查问题最重要的信息来源
    sudo tail -f /var/log/nginx/error.log

    # 查看 Nginx 访问日志,了解请求是否到达 Nginx 以及响应状态
    sudo tail -f /var/log/nginx/access.log

    # 查看系统日志中 Nginx 服务的相关信息
    sudo journalctl -u nginx -f

    # 验证端口绑定情况,检查是否有其他服务占用了 80 或 443 端口
    sudo netstat -tlnp | grep :80
7. Ubuntu 22.04、24.04 和 25.04 对 Nginx 有啥区别?
主要区别体现在 Nginx 版本、支持周期以及一些功能特性上:
| 特性 | Ubuntu 22.04 | Ubuntu 24.04 | Ubuntu 25.04 |
|---|---|---|---|
| Nginx 版本 | 1.18.0+ | 1.24.0+ | 1.26.0+ |
| 支持周期 | 2027 年 | 2029 年 | 2026 年 |
| 安全更新 | 标准 | 增强 | 最新 |
| 性能 | 良好 | 更好 | 最佳 |
| 新功能与特性 | 基础 | 高级 | 最前沿 |
通常来说,LTS 版本(如 22.04 和 24.04)提供更长的支持周期和稳定性,更适合生产环境;而非 LTS 版本(如 25.04)则能让你更快地体验到 Nginx 的最新功能和性能改进。
总结与展望
朋友们,到这里,你已经成功在 Ubuntu 22.04、24.04 或 25.04 系统上安装并配置了一个功能完善的 Nginx Web 服务器。我们从最开始的安装,到配置防火墙,再到 Nginx 服务的管理,甚至连搭建 Server Blocks、安全加固和性能优化都一一攻克了。现在,你的 Web 服务器已经准备好,可以托管你的网站、充当反向代理、实现负载均衡,甚至处理高并发的应用请求了。
理解不同 Ubuntu 版本与 Nginx 的兼容性,也能帮助你为自己的项目做出明智的部署决策。通过我们一起学习的安全措施和性能调优选项,你的 Nginx 服务器在生产环境中将保持稳定、安全和高效。
这只是 Nginx 强大功能的冰山一角,Web 世界还有很多有趣的等着你去探索!
下一步,你可以继续探索:
- LEMP 栈:搭建完整的应用环境,学习如何在 Ubuntu 上安装
Linux、Nginx、MySQL和PHP(LEMP栈)。你可以参考:How To Install Linux, Nginx, MySQL, PHP (LEMP stack) on Ubuntu - SSL/TLS 设置:使用
Let's Encrypt为你的网站添加HTTPS加密,让网站更安全、更受信任:How To Secure Nginx with Let’s Encrypt on Ubuntu - 反向代理进阶:深入了解如何将 Nginx 配置为应用程序的反向代理,为你的
Node.js、Python或其他后端服务提供强大的前端支持:Nginx as a reverse proxy for your applications
不断学习,不断实践,你会在 DevOps 和 Web 开发的道路上越走越远,成为一名真正的“服务器魔法师”!
python flask项目部署到服务器上,并制作docker镜像
部署python web项目到服务器(使用docker)
参考 : https://blog.51cto.com/fish/6023519
(一)创建虚拟环境
创建目录
mkdir mytest
cd mytest

[root@python mytest]# pwd
/root/mytest

创建虚拟环境
[root@python mytest]# python3 -m venv myvenv

激活虚拟环境
[root@python mytest]# source myvenv/bin/activate

一旦激活虚拟环境后,将进入到该虚拟环境下的shell界面,如下:
(myvenv) [root@python mytest]#
(myvenv) [root@python mytest]# ll
total 16
-rw-r--r--. 1 root root 222 Mar 31 11:14 demo.py
-rw-r--r--. 1 root root 307 Mar 31 13:26 Dockerfile
-rw-r--r--. 1 root root 282 Mar 31 13:38 gunicorn.conf.py
drwxr-xr-x. 5 root root 100 Mar 31 11:45 myvenv
-rw-r--r--. 1 root root 261 Mar 31 13:03 requirements.txt
(myvenv) [root@python mytest]#
(二)创建flask项目
在文件夹mytest下,创建一个demo.py启动文件
from flask import Flask

app = Flask(__name__)

@app.route('/')
def hello():
    return 'hello docker & flask & 爱看书的小沐.'

if __name__ == '__main__':
    app.run(host="0.0.0.0", debug=True)
在该环境下执行demo.py文件, 由于没有flask环境将报错
(myvenv) [root@python mytest]# python demo.py
...

安装flask
(myvenv) [root@python mytest]# python install flask
...

再次运行demo.py
(myvenv) [root@python mytest]# python demo.py
 * Serving Flask app 'demo' (lazy loading)
 * Environment: production
   WARNING: This is a development server. Do not use it in a production deployment.
   Use a production WSGI server instead.
 * Debug mode: on
 * Running on all addresses.
   WARNING: This is a development server. Do not use it in a production deployment.
 * Running on http://10.0.0.101:5000/ (Press CTRL+C to quit)
 * Restarting with stat
 * Debugger is active!
 * Debugger PIN: 128-311-800

监听5000端口,可以正常跑起来
(三)安装 gunicorn gevent, 提高性能
(myvenv) [root@python mytest]# pip install gunicorn gevent flask

在mytest目录下创建gunicorn.conf.py配置文件
(myvenv) [root@python mytest]# vim gunicorn.conf.py

文件内容如下:
workers = 5    # 定义同时开启的处理请求的进程数量,根据网站流量适当调整
worker_class = "gevent"   # 采用gevent库,支持异步处理请求,提高吞吐量
bind = "0.0.0.0:5000"   #端口随便写,但是注意是否已经被占用。netstap -lntp
启动gunicorn,如下
(myvenv) [root@python mytest]# gunicorn demo:app -c gunicorn.conf.py
[2023-03-31 14:08:57 +0800] [58874] [INFO] Starting gunicorn 20.1.0
[2023-03-31 14:08:57 +0800] [58874] [INFO] Listening at: http://0.0.0.0:3000 (58874)
[2023-03-31 14:08:57 +0800] [58874] [INFO] Using worker: gevent
[2023-03-31 14:08:57 +0800] [58877] [INFO] Booting worker with pid: 58877
[2023-03-31 14:08:57 +0800] [58878] [INFO] Booting worker with pid: 58878
[2023-03-31 14:08:57 +0800] [58879] [INFO] Booting worker with pid: 58879
[2023-03-31 14:08:57 +0800] [58880] [INFO] Booting worker with pid: 58880
[2023-03-31 14:08:57 +0800] [58881] [INFO] Booting worker with pid: 58881
(四)将项目部署到docker上
(1) 执行如下命令, 生成python项目所依赖的包文件, 将其写入到requirements.txt文件中
(myvenv) [root@python mytest]# pip freeze > requirements.txt
(myvenv) [root@python mytest]# ll
total 16
-rw-r--r--. 1 root root 222 Mar 31 11:14 demo.py
-rw-r--r--. 1 root root 282 Mar 31 13:38 gunicorn.conf.py
drwxr-xr-x. 5 root root 100 Mar 31 11:45 myvenv
drwxr-xr-x. 2 root root  69 Mar 31 14:08 __pycache__
-rw-r--r--. 1 root root 261 Mar 31 13:03 requirements.txt
(myvenv) [root@python mytest]# cat requirements.txt
click==8.0.4
dataclasses==0.8
Flask==2.0.3
gevent==22.10.2
greenlet==2.0.2
gunicorn==20.1.0
importlib-metadata==4.8.3
itsdangerous==2.0.1
Jinja2==3.0.3
MarkupSafe==2.0.1
typing_extensions==4.1.1
Werkzeug==2.0.3
zipp==3.6.0
zope.event==4.6
zope.interface==5.5.2
(myvenv) [root@python mytest]#
(2) 创建Dockerfile文件, 用于构建自己的镜像
(myvenv) [root@python mytest]# vim Dockerfile
(myvenv) [root@python mytest]# cat Dockerfile
FROM python:3.8

WORKDIR /project/

COPY requirements.txt ./
RUN python -m pip install --upgrade pip
RUN pip install --ignore-requires-python dataclasses==0.8
RUN pip install -r requirements.txt -i https://pypi.tuna.tsinghua.edu.cn/simple

#将当前所有文件拷贝到要制作的docker镜像中
COPY . .

CMD ["gunicorn", "demo:app", "-c", "./gunicorn.conf.py"]
(3) 配置docker镜像加速地址
[root@python mytest]#  mkdir -p /etc/docker
[root@python mytest]#  tee /etc/docker/daemon.json <<-'EOF'
{
    "registry-mirrors": [
	"https://o6ul5754.mirror.aliyuncs.com",
	"https://ung2thfc.mirror.aliyuncs.com",
	"https://registry.docker-cn.com",
	"http://hub-mirror.c.163.com",
	"https://docker.mirrors.ustc.edu.cn"
	]
}
EOF
[root@python mytest]#  cat /etc/docker/daemon.json
{
    "registry-mirrors": [
	"https://o6ul5754.mirror.aliyuncs.com",
	"https://ung2thfc.mirror.aliyuncs.com",
	"https://registry.docker-cn.com",
	"http://hub-mirror.c.163.com",
	"https://docker.mirrors.ustc.edu.cn"
	]
}
[root@python mytest]#  systemctl daemon-reload
[root@python mytest]#  systemctl restart docker

验证配置是否生效
[root@python mytest]# docker info
Client:
 Context:    default
 Debug Mode: false
 Plugins:
  buildx: Docker Buildx (Docker Inc.)
    Version:  v0.10.4
    Path:     /usr/libexec/docker/cli-plugins/docker-buildx
  compose: Docker Compose (Docker Inc.)
    Version:  v2.17.2
    Path:     /usr/libexec/docker/cli-plugins/docker-compose
  scan: Docker Scan (Docker Inc.)
    Version:  v0.23.0
    Path:     /usr/libexec/docker/cli-plugins/docker-scan

Server:
 Containers: 5
  Running: 0
  Paused: 0
  Stopped: 5
 Images: 3
 Server Version: 23.0.2
 Storage Driver: overlay2
  Backing Filesystem: xfs
  Supports d_type: true
  Using metacopy: false
  Native Overlay Diff: true
  userxattr: false
 Logging Driver: json-file
 Cgroup Driver: cgroupfs
 Cgroup Version: 1
 Plugins:
  Volume: local
  Network: bridge host ipvlan macvlan null overlay
  Log: awslogs fluentd gcplogs gelf journald json-file local logentries splunk syslog
 Swarm: inactive
 Runtimes: io.containerd.runc.v2 runc
 Default Runtime: runc
 Init Binary: docker-init
 containerd version: 1e1ea6e986c6c86565bc33d52e34b81b3e2bc71f
 runc version: v1.1.4-0-g5fd4c4d
 init version: de40ad0
 Security Options:
  seccomp
   Profile: builtin
 Kernel Version: 3.10.0-957.el7.x86_64
 Operating System: CentOS Linux 7 (Core)
 OSType: linux
 Architecture: x86_64
 CPUs: 1
 Total Memory: 1.934GiB
 Name: python
 ID: IP2S:J2XT:35RB:KK7O:HFQ5:FMME:HNT2:LYFR:74GT:7CWE:GXGM:446B
 Docker Root Dir: /var/lib/docker
 Debug Mode: false
 Registry: https://index.docker.io/v1/
 Experimental: false
 Insecure Registries:
  127.0.0.0/8
 Registry Mirrors:
  https://o6ul5754.mirror.aliyuncs.com/
  https://ung2thfc.mirror.aliyuncs.com/
  https://registry.docker-cn.com/
  http://hub-mirror.c.163.com/
  https://docker.mirrors.ustc.edu.cn/
 Live Restore Enabled: false
(4) 制作docker镜像
[root@python mytest]# docker build -t myapp:1.0 .
[+] Building 18.5s (12/12) FINISHED
 => [internal] load build definition from Dockerfile                                                                                                                                         0.0s
 => => transferring dockerfile: 406B                                                                                                                                                         0.0s
 => [internal] load .dockerignore                                                                                                                                                            0.0s
 => => transferring context: 2B                                                                                                                                                              0.0s
 => [internal] load metadata for docker.io/library/python:3.8                                                                                                                                0.2s
 => [1/7] FROM docker.io/library/python:3.8@sha256:4c4e6735f46e7727965d1523015874ab08f71377b3536b8789ee5742fc737059                                                                          0.0s
 => [internal] load build context                                                                                                                                                            0.2s
 => => transferring context: 370.95kB                                                                                                                                                        0.2s
 => CACHED [2/7] WORKDIR /project/                                                                                                                                                           0.0s
 => CACHED [3/7] COPY requirements.txt ./                                                                                                                                                    0.0s
 => CACHED [4/7] RUN python -m pip install --upgrade pip                                                                                                                                     0.0s
 => [5/7] RUN pip install --ignore-requires-python dataclasses==0.8                                                                                                                          2.3s
 => [6/7] RUN pip install -r requirements.txt -i https://pypi.tuna.tsinghua.edu.cn/simple                                                                                                   12.5s
 => [7/7] COPY . .                                                                                                                                                                           2.2s
 => exporting to image                                                                                                                                                                       1.2s
 => => exporting layers                                                                                                                                                                      1.1s
 => => writing image sha256:4afe28f18625b8bf5cdcb9785d158e9917561d1d6de1367e71bf4fa3d40fc407                                                                                                 0.0s
 => => naming to docker.io/library/myapp:1.0                                                                                                                                                 0.0s
[root@python mytest]# docker images
REPOSITORY    TAG       IMAGE ID       CREATED          SIZE
myapp         1.0       4afe28f18625   59 minutes ago   1.01GB
hello-world   latest    feb5d9fea6a5   18 months ago    13.3kB
(5) 运行该镜像成docker容器
[root@python mytest]# docker run -d -p 5000:5000 myapp:1.0
a91f1d816659e5abcd74a34d4bfc2a049a60c98d0a797a49202a7cc83bbc0778
[root@python mytest]#
浏览器访问 http://10.0.0.101:5000 页面可以正常访问并获取到数据
(6) 如果修改代码, 需要重新制作该镜像文件, 例如修改demo.py文件如下
from flask import Flask

app = Flask(__name__)

@app.route('/')
def hello():
    return 'hello docker 666'

if __name__ == '__main__':
    app.run(host="0.0.0.0", debug=True, threaded=True)
同时修改端口5000为3000; 重新制作docker镜像文件
[root@python mytest]# docker build -t myapp:1.1 .  # 这次打的标签tag版本为1.1
[root@python mytest]# docker build -t myapp:1.1 .
[+] Building 16.6s (12/12) FINISHED
 => [internal] load build definition from Dockerfile                                                                                                                                         0.0s
 => => transferring dockerfile: 406B                                                                                                                                                         0.0s
 => [internal] load .dockerignore                                                                                                                                                            0.0s
 => => transferring context: 2B                                                                                                                                                              0.0s
 => [internal] load metadata for docker.io/library/python:3.8                                                                                                                               15.2s
 => [1/7] FROM docker.io/library/python:3.8@sha256:4c4e6735f46e7727965d1523015874ab08f71377b3536b8789ee5742fc737059                                                                          0.0s
 => [internal] load build context                                                                                                                                                            0.2s
 => => transferring context: 370.93kB                                                                                                                                                        0.2s
 => CACHED [2/7] WORKDIR /project/                                                                                                                                                           0.0s
 => CACHED [3/7] COPY requirements.txt ./                                                                                                                                                    0.0s
 => CACHED [4/7] RUN python -m pip install --upgrade pip                                                                                                                                     0.0s
 => CACHED [5/7] RUN pip install --ignore-requires-python dataclasses==0.8                                                                                                                   0.0s
 => CACHED [6/7] RUN pip install -r requirements.txt -i https://pypi.tuna.tsinghua.edu.cn/simple                                                                                             0.0s
 => [7/7] COPY . .                                                                                                                                                                           0.7s
 => exporting to image                                                                                                                                                                       0.5s
 => => exporting layers                                                                                                                                                                      0.5s
 => => writing image sha256:c7df86df2dd926af25bf4194e18abbd5af873ef25ba0ed5c5cbf686d8f2df62d                                                                                                 0.0s
 => => naming to docker.io/library/myapp:1.1                                                                                                                                                 0.0s
[root@python mytest]# docker images
REPOSITORY    TAG       IMAGE ID       CREATED          SIZE
myapp         1.1       c7df86df2dd9   7 seconds ago    1.01GB
myapp         1.0       4afe28f18625   11 minutes ago   1.01GB
hello-world   latest    feb5d9fea6a5   18 months ago    13.3kB
[root@python mytest]# docker run -d -p 3000:3000 myapp:1.1
254176fcad70aebde1bb80b120b7b1f715ea1c67ce2a4d3e949b5be1bec13abc
[root@python mytest]#
再次访问 http://10.0.0.101:3000 已经正常访问
(五) 保存镜像文件到指定目录下
查看当前镜像
[root@python mytest]# docker images
REPOSITORY    TAG       IMAGE ID       CREATED         SIZE
check_tools   1.4       1175ff06f5c3   21 hours ago    1.06GB
check_tools   1.3       908c5ec78290   22 hours ago    1.04GB
check_tools   1.2       c584b78ae39d   22 hours ago    1.04GB
check_tools   1.1       770dd461a2cf   22 hours ago    1.04GB
check_tools   1.0       2692e79d33a2   6 days ago      1.01GB
myapp         1.1       c7df86df2dd9   7 days ago      1.01GB
myapp         1.0       4afe28f18625   7 days ago      1.01GB
hello-world   latest    feb5d9fea6a5   18 months ago   13.3kB
hello-world   latest    feb5d9fea6a5   18 months ago   13.3kB

保存镜像到指定目录下
[root@python mytest]# docker save 1175ff06f5c3>/root/check_tools.tar #check_tools.tar为打包的文件

查看保存的镜像文件 check_tools.tar
[root@python mytest]# ll /root/
total 1075124
-rw-------.  1 root root       1650 Oct 22  2020 anaconda-ks.cfg
-rw-r--r--.  1 root root 1083920896 Apr  6 16:10 check_tools.tar
drwxr-xr-x.  4 root root        140 Apr  7 13:16 mytest
drwxr-xr-x. 17  501  501       4096 Jan 12  2021 Python-3.6.4
-rw-r--r--.  1 root root   16992824 Jan 12  2021 Python-3.6.4.tar.xz
drwxr-xr-x.  2 root root         66 Jan 20  2021 test
drwxr-xr-x.  3 root root         21 Jan 20  2021 virtualenv_1
[root@python mytest]#
(六) 在另一台主机上加载镜像文件
将上述步骤生成的
check_tools.tar文件拷贝到另一台机器上进行加载
[root@localhost ~]#  docker load < check_tools.tar        # check_tools.tar 为文件名称

查看镜像
[root@localhost ~]# docker images
REPOSITORY    TAG       IMAGE ID       CREATED         SIZE
check_tools   1.4       1175ff06f5c3   21 hours ago    1.06GB
[root@localhost ~]#

后台启动该镜像服务
[root@localhost ~]# docker ps
CONTAINER ID   IMAGE     COMMAND   CREATED   STATUS    PORTS     NAMES
[root@localhost ~]# docker run -d -p 3000:3000 check_tools:1.4
22870b5ee2f07c2faf85b9f29bbec078355b9dd510154abb6a2f299a0078792d
[root@localhost ~]# docker ps
CONTAINER ID   IMAGE             COMMAND                  CREATED          STATUS          PORTS                                       NAMES
22870b5ee2f0   check_tools:1.4   "gunicorn check_tool…"   35 seconds ago   Up 34 seconds   0.0.0.0:3000->3000/tcp, :::3000->3000/tcp   flamboyant_keller
[root@localhost ~]#  netstat -tunlp
Active Internet connections (only servers)
Proto Recv-Q Send-Q Local Address           Foreign Address         State       PID/Program name
tcp        0      0 0.0.0.0:22              0.0.0.0:*               LISTEN      7037/sshd
tcp        0      0 0.0.0.0:3000            0.0.0.0:*               LISTEN      14811/docker-proxy
tcp        0      0 127.0.0.1:25            0.0.0.0:*               LISTEN      7125/master
tcp6       0      0 :::22                   :::*                    LISTEN      7037/sshd
tcp6       0      0 :::3000                 :::*                    LISTEN      14815/docker-proxy
tcp6       0      0 ::1:25                  :::*                    LISTEN      7125/master
udp        0      0 127.0.0.1:323           0.0.0.0:*                           6325/chronyd
udp6       0      0 ::1:323                 :::*                                6325/chronyd
[root@localhost ~]#
(七)逻辑卷映射
为避免每次修改代码后, 都要重新制作镜像文件, 采用逻辑卷映射: 将宿主机的某个目录映射到镜像文件中的某个目录, 以后只需要宿主机中的对应文件就可以
逻辑卷映射 check_tool_data
[root@python mytest]# docker run -p 3000:3000 -v check_tool_data:/project/ check_tools:1.7
[2023-04-07 07:14:49 +0000] [1] [INFO] Starting gunicorn 20.1.0
[2023-04-07 07:14:49 +0000] [1] [INFO] Listening at: http://0.0.0.0:3000 (1)
[2023-04-07 07:14:49 +0000] [1] [INFO] Using worker: gevent
[2023-04-07 07:14:49 +0000] [8] [INFO] Booting worker with pid: 8
[2023-04-07 07:14:49 +0000] [9] [INFO] Booting worker with pid: 9
[2023-04-07 07:14:49 +0000] [10] [INFO] Booting worker with pid: 10
[2023-04-07 07:14:49 +0000] [11] [INFO] Booting worker with pid: 11
[2023-04-07 07:14:50 +0000] [12] [INFO] Booting worker with pid: 12
^C[2023-04-07 07:17:02 +0000] [1] [INFO] Handling signal: int
[2023-04-07 07:17:02 +0000] [8] [INFO] Worker exiting (pid: 8)
[2023-04-07 07:17:02 +0000] [9] [INFO] Worker exiting (pid: 9)
[2023-04-07 07:17:02 +0000] [12] [INFO] Worker exiting (pid: 12)
[2023-04-07 07:17:02 +0000] [11] [INFO] Worker exiting (pid: 11)
[2023-04-07 07:17:02 +0000] [10] [INFO] Worker exiting (pid: 10)
[2023-04-07 07:17:03 +0000] [1] [INFO] Shutting down: Master

查找逻辑卷位置
[root@python mytest]# find / -name check_tool_data
/var/lib/docker/volumes/check_tool_data
[root@python mytest]# cd /var/lib/docker/volumes/check_tool_data
[root@python _data]# ll
total 24
-rw-r--r--. 1 root root 7112 Apr  6 16:03 check_tools.py
-rw-r--r--. 1 root root  222 Mar 31 11:14 demo.py
-rw-r--r--. 1 root root  389 Apr  6 16:04 Dockerfile
-rw-r--r--. 1 root root  281 Apr  6 15:27 gunicorn.conf.py
drwxr-xr-x. 2 root root   71 Apr  7 15:14 json_file
drwxr-xr-x. 5 root root  100 Apr  7 15:14 myvenv
drwxr-xr-x. 2 root root   76 Apr  7 15:14 __pycache__
-rw-r--r--. 1 root root  280 Apr  6 15:39 requirements.txt
[root@python _data]#
之后只需要修改
/var/lib/docker/volumes/check_tool_data/check_tools.py文件就可以了, 修改代码重新启动容器就可以加载到修改后的代码了[root@python mytest]# docker run -p 3000:3000 -v check_tool_data:/project/ check_tools:1.7
您可
Rustdesk中继服务器Docker安装
阿里服务器:
ID服务器:106.15.137.139:21116
中继服务器:106.15.137.139:21117
key:rnkeJJ7rqtUjoR82abrohV1UxcyMScgKY5zOICQXxm4=

腾讯服务器:
ID服务器:43.136.104.74:21116
中继服务器:43.136.104.74:21117
key:GGGTNhzko53SaVUm+wt+hhuctkXwz91b7U5DFCRZvuI=
要求
您需要安装 Docker/Podman 才能将 rustdesk-server 作为 Docker 容器运行。如有疑问,请使用此指南安装 Docker,以确保它是最新的!
确保在防火墙中打开这些端口:
hbbs:21114(TCP): 用于网页控制台,仅在Pro版本中可用。21115(TCP): 用于 NAT 类型测试。21116(TCP/UDP): 请注意21116应该同时为 TCP 和 UDP 启用。21116/UDP用于 ID 注册和心跳服务。21116/TCP用于 TCP 打洞和连接服务。21118(TCP): 用于支持网页客户端。
hbbr:21117(TCP): 用于中继服务。21119(TCP): 用于支持网页客户端。
如果您不需要网页客户端支持,可以禁用相应的端口 21118、21119。
Docker 示例
sudo docker image pull rustdesk/rustdesk-server
sudo docker run --name hbbs -v ./data:/root -td --net=host --restart unless-stopped rustdesk/rustdesk-server hbbs
sudo docker run --name hbbr -v ./data:/root -td --net=host --restart unless-stopped rustdesk/rustdesk-server hbbr
Note
--net=host 仅在 Linux 上有效,这使得 hbbs/hbbr 看到真实的传入 IP 地址而不是容器 IP (172.17.0.1)。 如果 --net=host 工作正常,则不使用 -p 选项。如果在 Windows 上,请省略 sudo 和 --net=host。
如果您在您的平台上遇到连接问题,请移除 --net=host。
Note
如果您无法使用 -td 看到日志,可以通过 docker logs hbbs 查看日志。或者您可以使用 -it 运行,hbbs/hbbr 不会作为守护进程模式运行。
Docker Compose示例
要使用这里描述的 docker-compose.yml 运行 Docker 文件,您需要安装 Docker Compose。
networks:
  rustdesk-net:
    external: false

services:
  hbbs:
    container_name: hbbs
    ports:
      - 21115:21115
      - 21116:21116 # 自定义 hbbs 映射端口
      - 21116:21116/udp # 自定义 hbbs 映射端口
    image: docker.1ms.run/rustdesk/rustdesk-server:latest
    command: hbbs
    volumes:
      - ./hbbs_data:/root # 自定义挂载目录
    networks:
      - rustdesk-net
    depends_on:
      - hbbr
    restart: unless-stopped
    deploy:
      resources:
        limits:
          memory: 64M

  hbbr:
    container_name: hbbr
    ports:
      - 21117:21117 # 自定义 hbbr 映射端口
    image: docker.1ms.run/rustdesk/rustdesk-server:latest
    command: hbbr
    volumes:
      - ./hbbr_data:/root # 自定义挂载目录
    networks:
      - rustdesk-net
    restart: unless-stopped
    deploy:
      resources:
        limits:
          memory: 64M
ubuntu+Windows双系统默认引导顺序
在 Ubuntu 中修改引导顺序
打开ubuntu系统以后,我们打开超级终端,输入以下命令
sudo gedit /etc/default/grub
我装了双系统,Windows的选择在最下面,所以是4(具体数字看你显示,上图标注了0开始)
修改完成后要重新编译引导文件生效。
sudo update-grub
在 Windows 中添加 Ubuntu 引导项
以管理员身份打开 PowerShell,执行:
bcdedit /set "{bootmgr}" path \EFI\ubuntu\grubx64.efi
重启后应出现 GRUB 菜单。
tailscale 自建服务器
为什么是VPN?
前面讲过,我企图打通各个住所和学校的内网。列位要问了,你不是搞过FRP内网穿透吗,为啥还要VPN?我个人的理解是:FRP侧重于服务,依托于开放的端口;VPN侧重于互连,依托于C/S架构和IP,对比于下表。可见,要打通各个内网,必须使用基于VPN的技术才行。
| 对比项 | FRP | VPN |
|---|---|---|
| 开放端口数 | 随服务数增加 | 很少 |
| 主要应用 | 对外提供服务,网页服务较多 | 对内提供连通 |
| 穿透方向 | 单向 | 双向(通过路由) |
| 安全性 | 一般 | 强 |
| IP级互连 | 不支持 | 支持 |
| 额外的客户端 | 不需要 | 一般需要 |
| 部署难度 | 容易 | 困难 |
用哪个VPN?
关于主流VPN技术,下面这篇文章总结的挺好。
我斗胆再一句话总结下:PPTP不安全;OpenVPN针对IPSec/L2TP做了减法;WireGuard针对OpenVPN又做了减法,性能更高,还支持了去中心化。
可见,WireGuard是目前最先进的VPN技术,已被引入Linux内核,必须选她!
还有个原因,群晖的VPN服务端都被阉割了,自己装套件起
OpenVPN也不行;威联通的OpenVPN服务端可以,但静态路由设置时总是出错。
为什么是Headscale?
WireGuard目前只是一个内核级别的模块,想要配置好裸的WireGuard,低代码是别想了,那么多对端秘钥,增、删节点都需要改动所有节点的配置,想一想就头疼!
表扬威联通,已经支持图形化界面的
WireGuard服务器和客户端。
基于WireGuard的上层应用,目前比较成熟的有Tailscale和Netmaker。Tailscale 是在用户态实现了 WireGuard 协议;Netmaker 直接使用了内核态的WireGuard,理论上性能更高,但目前缺乏中继机制(类似FRP),应用场景受限。Headscale是Tailscale的开源实现,适合私有部署,就选她了!
本文动机
知乎上介绍Headscale的很少;找遍全网,也很少有低代码、快速部署Headscale的文章,能讲清楚原理和为什么这样配置的就更少了。
仍然要感谢一些博主,虽然不讲原理,但内容确实丰富,给我一定启发(其实是偷懒不用去看文档了),比如下面这个。
Tailscale玩法之内网穿透、异地组网、全隧道模式、纯IP的双栈DERP搭建、Headscale协调服务器搭建,用一期搞定,看一看不亏吧?
我在群晖和威联通的NAS上都用docker-compose部署成功了,必须向大家汇报下,希望能帮助更多非专业领域的“私有云折腾师”。
Headscale搭建
架构介绍
主节点(我自己定义的概念)的网络拓扑如下图所示。其他节点与之类似,不包含服务端及其UI。
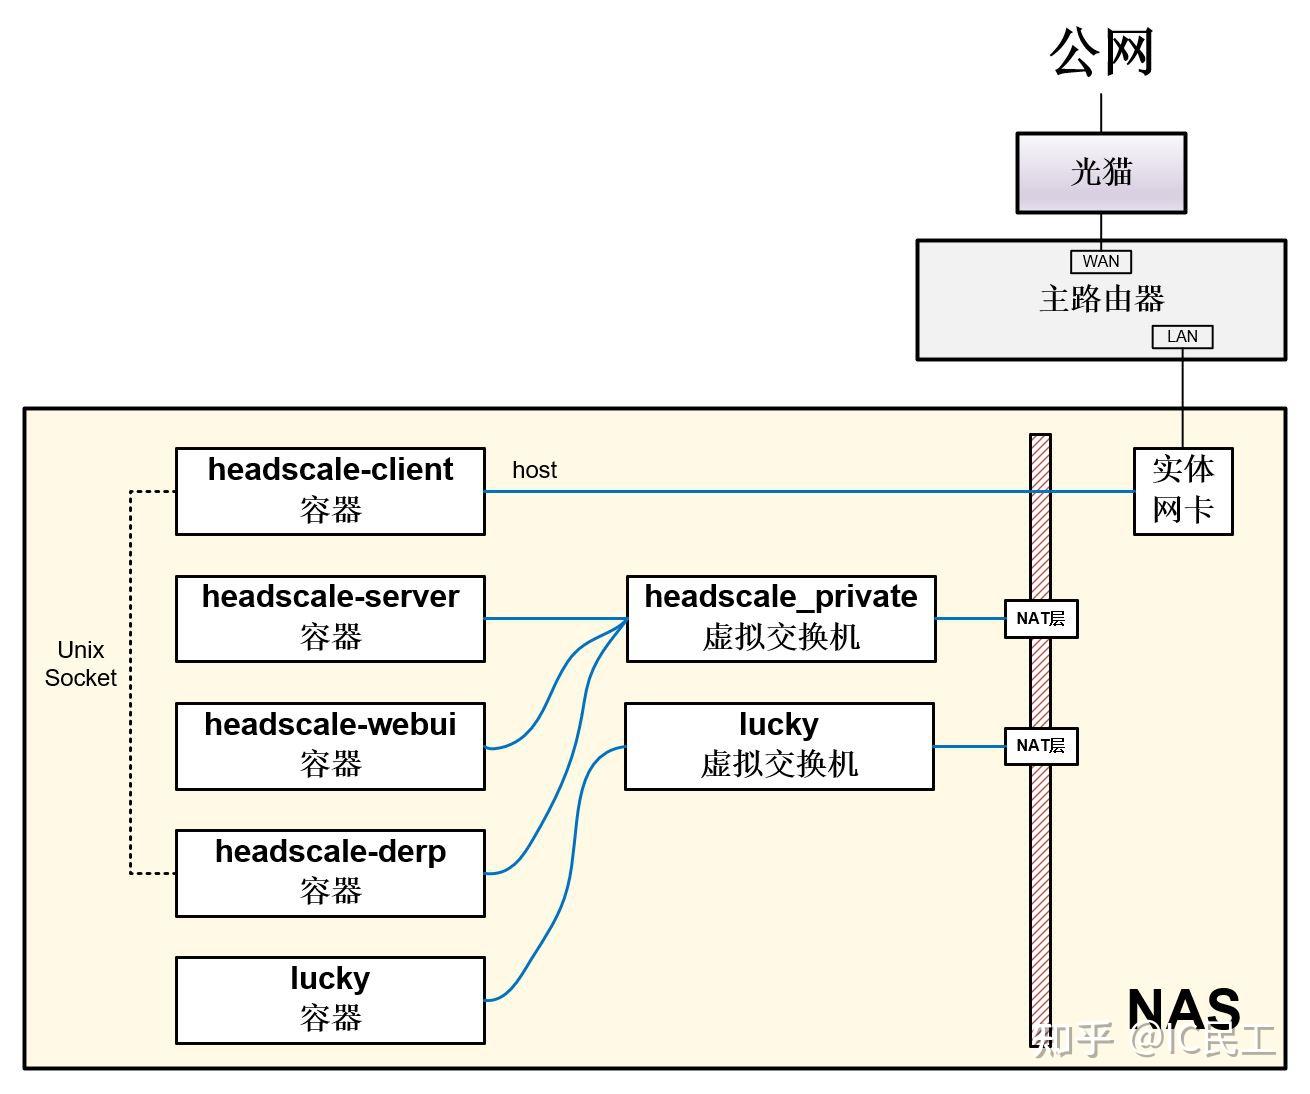
主节点网络拓扑
服务端(server),又叫协调服务器。负责WireGuard节点的公钥交换、虚拟IP分配、路由转发的公开和访问控制。
客户端(client),即WireGuard节点。目前仍然使用的是Tailscale的开源客户端,采用go语言编写,在用户空间实现WireGuard。
中继端(derp),是P2P连接时NAT穿透的保底方案。DERP(Detoured Encrypted Routing Protocol)是Tailscale自研的协议,运行在 HTTP 之上 ,根据目的公钥来中继加密的流量。中继端同时支持DERP和STUN。
关于NAT穿透的原理,可以参考下面这篇。
NAT穿透arthurchiao.art/blog/how-nat-traversal-works-zh/
可见,服务端负责控制,中继端负责数据通路,客户端发起/接受连接,是可以部署在不同的服务器上的。这里我们资源有限,把他们都部署在一个NAS里,还需要使用反向代理(lucky)以“零代码”支持带SSL证书的HTTPS访问;为了“低代码”配置服务端,我们给她再加一个服务端控制界面(webui,以下简称UI端),齐活。
关于客户端,其实有两个作用。一是做为WireGuard的节点连到大内网里。
这时,为了减少路由的层级,其容器的网络类型一般设为host。
二是通过Unix的进程间通信(sock)为中继端提供用户认证,防止中继端被他人使用。
通过把客户端和中继端的/var/run/headscale链接在一起来实现。这时,其容器的网络类型最好设为bridge。
如何选择容器网络类型,可以参考下面的公式。
假设,中继端部署在服务器A上,负责VPN路由的是服务器B。
if(A == B)
  在A上部署客户端,容器网络使用host。
else {
  在A上部署客户端,容器网络使用bridge或host都行。
  在B上部署客户端;如果使用容器,其网络使用host。// 例如,OpenWRT上可以直接部署。
}
关于自定义的容器子网,可以参考下面这篇文章。
我把这些容器都部署在一个NAS上,所以用host。相关的端口如下表,使用了基于子域名的lucky反向代理后,只需要对公网(别忘了在路由器上做端口映射)暴露一个STUN的UDP3478端口(新增)和一个lucky反向代理的端口(例如8080,已有)。相比FRP,美极了。
| 服务端 | UI端 | 中继端DERP | 中继端STUN | |
|---|---|---|---|---|
| 端口类型 | TCP | TCP | TCP | UDP |
| 容器侧端口 | 8080 | 7070 | 6060 | 3478 |
| NAS侧端口 | 58080 | 57070 | 56060 | 3478 |
| HTTPS反向代理 | 需要 | 需要 | 需要 | 不需要 |
容器编排
直接给出带注释的四合一docker-compose.yaml,全网罕见。
version: '3.9'

networks: # 定义编排容器的子网
  private:
    driver: bridge
    ipam:
      config:
        - subnet: 172.28.200.0/24

services:
  server: # 服务端
    image: headscale/headscale
    container_name: headscale-server
    networks:
      - private
    volumes:
      - ./headscale/config:/etc/headscale # 提前放好config.yaml和derp.yaml
      - ./headscale/data:/var/lib/headscale
      - ./headscale/run:/var/run/headscale
      - /usr/share/zoneinfo/Asia/Shanghai:/etc/localtime:ro # 使用NAS的时间
    ports:
      - "58080:8080" # listen port
    command: serve # v0.22及以前的版本需要使用headscale serve
    restart: unless-stopped
    depends_on:
      - derp

  webui: # UI端
    image: ghcr.io/gurucomputing/headscale-ui
    container_name: headscale-ui
    networks:
      - private
    environment:
      HTTP_PORT: 7070
    ports:
      - "57070:7070"
    volumes:
      - /usr/share/zoneinfo/Asia/Shanghai:/etc/localtime:ro
    restart: unless-stopped

  derp: # 中继端
    image: fredliang/derper
    container_name: headscale-derp
    networks:
      - private
    environment:
      DERP_DOMAIN: derp.bakeding.site # 替换为自己的域名
      DERP_ADDR: :6060 # 注意,前面有个英文冒号
      DERP_CERT_MODE: letsencrypt # 使用了lucky做反向代理,理论上不需要设置,但我还没试过。
      DERP_VERIFY_CLIENTS: true # 还用client做认证时,配置为true
    ports:
      - "56060:6060" # derp port, TCP
      - "3478:3478/udp"  # STUN port, UDP
    volumes:
      - ./tailscale:/var/run/tailscale
      - /usr/share/zoneinfo/Asia/Shanghai:/etc/localtime:ro
    restart: unless-stopped
    depends_on:
      - client

  client: # 客户端
    image: tailscale/tailscale
    container_name: headscale-client
    network_mode: "host" # 用做连接各子网的客户端时,这样最简单
    privileged: true
    environment:
      TS_EXTRA_ARGS: --netfilter-mode = off # 默认不开启路由转发,更灵活
    volumes:
      - ./tailscale:/var/run/tailscale # 要在NAS上和derp共享同一个目录
      - /usr/share/zoneinfo/Asia/Shanghai:/etc/localtime:ro
      - /var/lib:/var/lib
      - /dev/net/tun:/dev/net/tun
    cap_add:
      - net_admin
      - sys_module
    command: tailscaled
    restart: unless-stopped
注意,要提前配置好config.yaml和derp.yaml。可以去GitHUB的代码仓,下载config-example.yaml和derp-example.yaml,修改好内容(见下文)并重命名。
我用的是
latest映像,当前对应源码的版本是v0.23.0-alpha5。配置文件如果报错,可以去搜一下Issues,一般都有答案。
另外,只需要把docker-compose.yaml中server和webui的部分注释掉,就可以部署在其他节点。如果不想增加中继端,也可以把derp的部分注释掉。
服务端配置
config.yaml中修改的地方如下。
server_url要改成反向代理后的网址。- 把
urls下面的网址注释掉,不使用官方的中继端。 - 增加
derp.yaml的位置,指定自己搭建的中继端。 - 注意各端口要和
docker-compose.yaml中的对应。
    server_url: https://tailscale.bakeding.site
    listen_addr: 0.0.0.0:8080
    # Address to listen to /metrics, you may want to keep this endpoint private to your internal network
    metrics_listen_addr: 0.0.0.0:9090
    grpc_listen_addr: 0.0.0.0:50443 # 看起来没啥用
    ip_prefixes:
      100.100.0.0/16
      # List of externally available DERP maps encoded in JSON
      urls:
        #- https://controlplane.tailscale.com/derpmap/default

      # Locally available DERP map files encoded in YAML
      paths:
        - /etc/headscale/derp.yaml
derp.yaml如下,这里我添加了两个中继端。
# If you plan to somehow use headscale, please deploy your own DERP infra: https://tailscale.com/kb/1118/custom-derp-servers/
regions:
  901:
    regionid: 901
    regioncode: huoyan
    regionname: tencent
    nodes:
      - name: tencent-derp
        regionid: 901
        hostname: derp.bakeding.site
        stunport: 3478
        stunonly: false
        derpport: 56060

      902:
        regionid: 902
        regioncode: hk
        regionname: Hongkong Telecom
        nodes:
          - name: shelter2-derp
            regionid: 902
            hostname: derp.mirror.example.com
            stunport: 3478
            stunonly: false
            derpport: 56060
反向代理配置
headscale-server和derp正常进行反代就行了,ui端因为跨域的原因,需要在同一个域里。如您按照本文提供的内容进行创建的话,那么你可以直接使用此nginx配置,否则请自行修改相应端口。
server {
	#监听443端口
    listen 443 ssl;
    #你的域名
    server_name tailscale.bakeding.site;
	access_log /var/log/nginx/tailscale443.log;
    #ssl证书的pem文件路径
    ssl_certificate  /www/cert/tailscale.bakeding.site_bundle.pem;
    #ssl证书的key文件路径
    ssl_certificate_key /www/cert/tailscale.bakeding.site.key;

    location ^~ / {
		proxy_pass http://127.0.0.1:58080;
		proxy_set_header Host $host;
		proxy_set_header X-Real-IP $remote_addr;
		proxy_set_header X-Forwarded-For $proxy_add_x_forwarded_for;
		proxy_set_header REMOTE-HOST $remote_addr;
		proxy_set_header Upgrade $http_upgrade;
		proxy_set_header Connection "upgrade";
		proxy_set_header X-Forwarded-Proto $scheme;
		proxy_http_version 1.1;
		add_header X-Cache $upstream_cache_status;
		add_header Strict-Transport-Security "max-age=31536000";
		add_header Cache-Control no-cache;
	}

	location ^~ /web {
		proxy_pass http://127.0.0.1:57070;
		proxy_set_header Host $host;
		proxy_set_header X-Real-IP $remote_addr;
		proxy_set_header X-Forwarded-For $proxy_add_x_forwarded_for;
		proxy_set_header REMOTE-HOST $remote_addr;
		proxy_set_header Upgrade $http_upgrade;
		proxy_set_header Connection "upgrade";
		proxy_set_header X-Forwarded-Proto $scheme;
		proxy_http_version 1.1;
		add_header X-Cache $upstream_cache_status;
		add_header Strict-Transport-Security "max-age=31536000";
		add_header Cache-Control no-cache;
	}

}
server {
	listen       80;	#监听80端口
	listen  [::]:80;
	server_name  tailscale.bakeding.site;		#也可以填写自己注册的域名
	access_log /var/log/nginx/default.log;

	location ^~ / {
		proxy_pass http://127.0.0.1:56060;
		proxy_set_header Host $host;
		proxy_set_header X-Real-IP $remote_addr;
		proxy_set_header X-Forwarded-For $proxy_add_x_forwarded_for;
		proxy_set_header REMOTE-HOST $remote_addr;
		proxy_set_header Upgrade $http_upgrade;
		proxy_set_header Connection "upgrade";
		proxy_set_header X-Forwarded-Proto $scheme;
		proxy_http_version 1.1;
		add_header X-Cache $upstream_cache_status;
		add_header Strict-Transport-Security "max-age=31536000";
	}

	location ^~ /web {
		proxy_pass http://127.0.0.1:57070;
		proxy_set_header Host $host;
		proxy_set_header X-Real-IP $remote_addr;
		proxy_set_header X-Forwarded-For $proxy_add_x_forwarded_for;
		proxy_set_header REMOTE-HOST $remote_addr;
		proxy_set_header Upgrade $http_upgrade;
		proxy_set_header Connection "upgrade";
		proxy_set_header X-Forwarded-Proto $scheme;
		proxy_http_version 1.1;
		add_header X-Cache $upstream_cache_status;
		add_header Strict-Transport-Security "max-age=31536000";
		add_header Cache-Control no-cache;
	}


    #error_page  404              /404.html;
    # redirect server error pages to the static page /50x.html
    #
    error_page   500 502 503 504  /50x.html;		#错误页面设置
    location = /50x.html {
        root   /usr/share/nginx/html;
    }
}

server {
	#监听443端口
    listen 443 ssl;
    #你的域名
    server_name derp.bakeding.site;
	access_log /var/log/nginx/derp443.log;
    #ssl证书的pem文件路径
    ssl_certificate  /www/cert/derp.bakeding.site_bundle.pem;
    #ssl证书的key文件路径
    ssl_certificate_key /www/cert/derp.bakeding.site.key;

    location ^~ / {
		proxy_pass http://127.0.0.1:56060;
		proxy_set_header Host $host;
		proxy_set_header X-Real-IP $remote_addr;
		proxy_set_header X-Forwarded-For $proxy_add_x_forwarded_for;
		proxy_set_header REMOTE-HOST $remote_addr;
		proxy_set_header Upgrade $http_upgrade;
		proxy_set_header Connection "upgrade";
		proxy_set_header X-Forwarded-Proto $scheme;
		proxy_http_version 1.1;
		add_header X-Cache $upstream_cache_status;
		add_header Strict-Transport-Security "max-age=31536000";
	}

}
server {
	listen       80;	#监听80端口
	listen  [::]:80;
	server_name  tailscale.bakeding.site;		#也可以填写自己注册的域名
	access_log /var/log/nginx/default.log;

	location ^~ / {
		proxy_pass http://127.0.0.1:56060;
		proxy_set_header Host $host;
		proxy_set_header X-Real-IP $remote_addr;
		proxy_set_header X-Forwarded-For $proxy_add_x_forwarded_for;
		proxy_set_header REMOTE-HOST $remote_addr;
		proxy_set_header Upgrade $http_upgrade;
		proxy_set_header Connection "upgrade";
		proxy_set_header X-Forwarded-Proto $scheme;
		proxy_http_version 1.1;
		add_header X-Cache $upstream_cache_status;
		add_header Strict-Transport-Security "max-age=31536000";
	}


    #error_page  404              /404.html;
    # redirect server error pages to the static page /50x.html
    #
    error_page   500 502 503 504  /50x.html;		#错误页面设置
    location = /50x.html {
        root   /usr/share/nginx/html;
    }
}
服务端操作(步骤1)
其实服务端支持很多命令行操作,但我们追求“低代码”,只需要用命令行生成一个API Key,剩下的工作在UI端点鼠标就行了。
进入容器,执行命令,把生成的API Key记录下来:ynREpBS.UduOZ_Dwxu1WRreh6vMKvUsiNwvefz_n
$ headscale apikeys create -e 9999d
其中,-e后面指定的是过期时间,这里我指定9999天,27年后看能否有人攻破。
也可以在宿主机上执行,前面加
sudo docker exec -it即可,不会的可以练练。
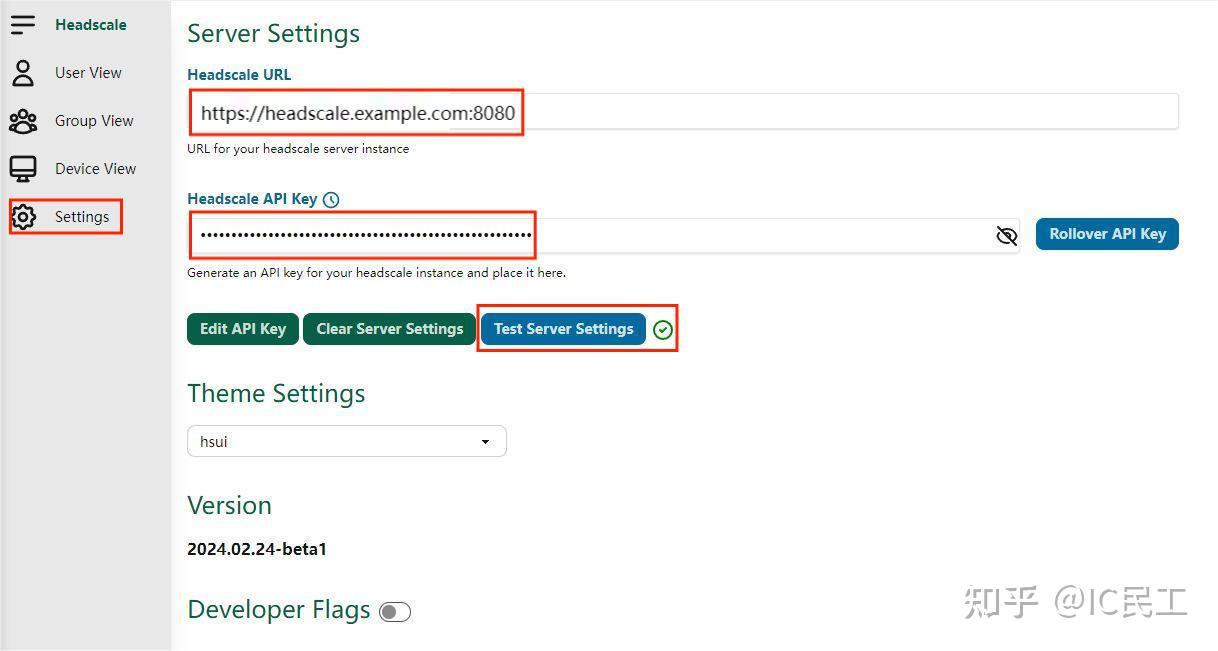
UI端操作(步骤2)
- 打开UI的URL,本例为
https://tailscale.bakeding.site/web。
2. 进入“Settings”。
3. 添加“Headscale URL”,本例为https://tailscale.bakeding.site。
4. 把服务端生成的Key添加到“Headscale API Key”。
5. 点击“Test Server Settings”,出现绿色对号后UI端就可以接管服务端了,如下图所示。
UI端添加API Key
6. 进入“User View”,点击“+New User”,添加一个用户。

UI端添加用户
7. 为该用户生成一个Preauth Key,供客户端连接使用。为了便捷性,最好设置为“Reusable”,并“Active”,如下图。
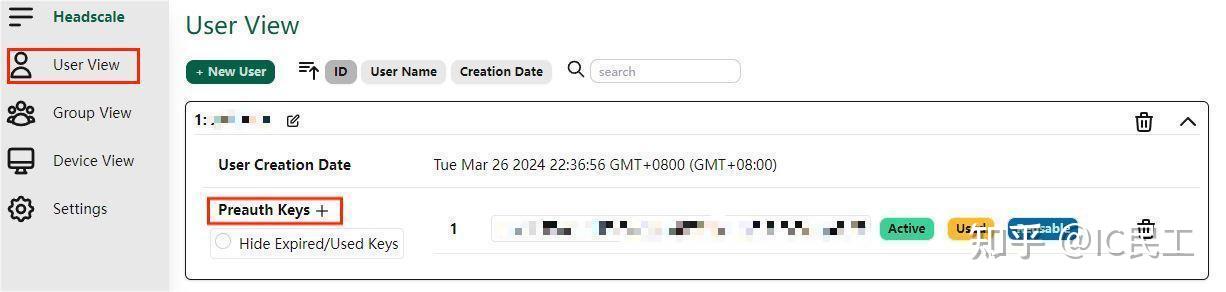
UI端添加Preauth Key
连接的密钥设置比较灵活,有两种方法。一种是上面这种:在服务端生成Preauth Key(1个共享或多个独立),客户端连接时指定,成功后在“Device View”里就能看到各个节点。另一种是在客户端连接时生成,在UI端的“Device View”里手动添加秘钥、注册节点。我这么懒惰,当然共享1个Preauth Key。
客户端操作(步骤3)
- 进入各客户端的容器,执行命令。
   tailscale up --netfilter-mode=off \
                 --accept-routes \
                 --advertise-routes=192.168.2.0/24 \
                 --login-server=https://tailscale.bakeding.site \
                 --auth-key=c5765d7426fe55c005ffda74419ec38f9a32fd770fa13199
--accept-routes代表接受其他节点的路由指示。--advertise-routes指定本节点对其他节点的路由建议,即哪个网段走VPN到本节点。一般是本节点的内网网段。--login-server指定服务端的URL。--auth-key指定在UI端生成的Preauth Key。
2. 打开UI端网页,进入“Device View”,把各节点的“Device Routes”设置为“active”,如下图。
这里还可以看到各个节点分配的VPN IP地址。
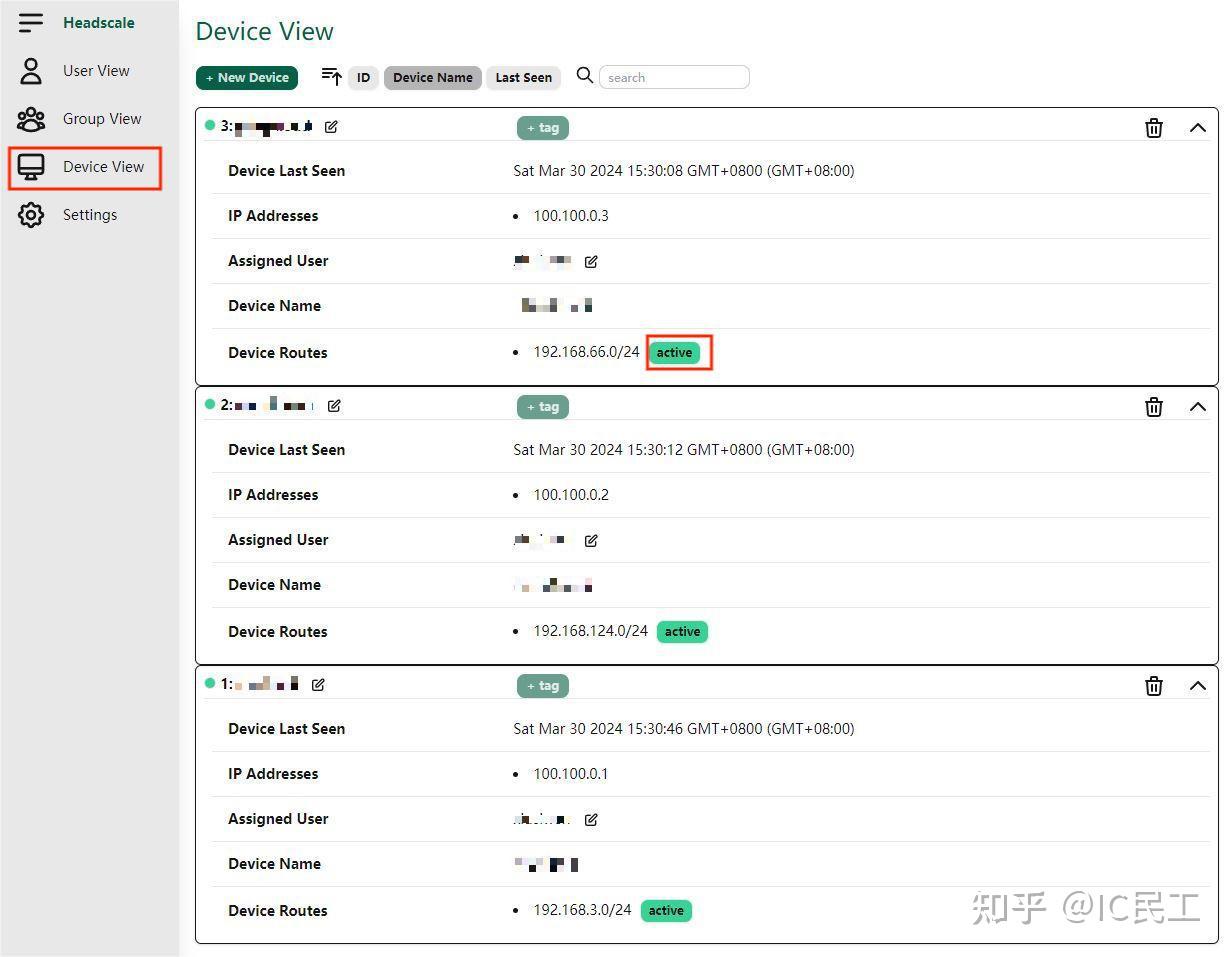
UI端开启Devic Routes
NAS配置(步骤4)
要在NAS上开启路由转发,把VPN路由过来的包转发到内网。
-
通过ssh登录到NAS,执行命令。
$ ip addr
2. 找到NAS的内网IP地址所对应的虚拟网卡名,我这里是ovs_eth0;找到VPN地址所对应的网卡名,我这里是tailscale0。
3. 执行命令:启用IPv4转发功能;防火墙配置了两个网络接口(ovs_eth0和tailscale0)的数据包转发规则,并执行网络地址转换(NAT)操作。使能了VPN子网和内网的双向互访。
   sudo iptables -I FORWARD -i ovs_eth0 -j ACCEPT
   sudo iptables -I FORWARD -o ovs_eth0 -j ACCEPT
   sudo iptables -t nat -I POSTROUTING -o ovs_eth0 -j MASQUERADE
   sudo iptables -I FORWARD -i tailscale0 -j ACCEPT
   sudo iptables -I FORWARD -o tailscale0 -j ACCEPT
   sudo iptables -t nat -I POSTROUTING -o tailscale0 -j MASQUERADE
   sudo sysctl -w net.ipv4.ip_forward=1
4. 最后,把它们加到群晖的“计划任务”,开机触发启动。
- 去掉所有
sudo,以root执行。 - 为了保证VPN相关的容器先启动,最上面最好加个
sleep 1m。
主路由配置(步骤5)
为了让本节点内网的其他地址也能通过VPN访问其他节点的内网,需要在主路由上添加静态路由,例如下表。
| 描述 | 目的地址 | 子网掩码 | 下一跳地址 | 出接口 |
|---|---|---|---|---|
| 访问VPN节点 | 100.100.0.0 | 255.255.0.0 | 本节点NAS地址 | LAN |
| 访问其他节点的内网 | 其他节点的内网网段 | 其他节点的内网掩码 | 本节点NAS地址 | LAN |
经过ping测试,大功告成!
参考文章 Tailscale/Headscale自建异地组网 Tailscale+Headscale+自建Derp踩坑记录 已验证:自建Tailscale的 DERP 中继教程
tailscale客户端连接headscale
阿里服务器:
https://tailscale.bakeding.site
** Headscale API Key:**
vrSvmc5.TU76cARTlr0Ifv2kdDaBvuthY1GuqEi0
** eason user Preauth Keys: **
6aa4e048254831ebae24254359a04bff94b22e6b93f56958
** 运行命令:**
tailscale up -login-server https://tailscale.bakeding.site -authkey 6aa4e048254831ebae24254359a04bff94b22e6b93f56958 -accept-dns=false -accept-routes --advertise-exit-node --reset
tailscale up -login-server https://tailscale.bakeding.site -authkey 6aa4e048254831ebae24254359a04bff94b22e6b93f56958 -accept-dns=false -accept-routes  --advertise-routes=10.8.0.0/24 --advertise-exit-node --reset
腾讯服务器:
https://tailscale.bakeding.site
** Headscale API Key:**
ynREpBS.UduOZ_Dwxu1WRreh6vMKvUsiNwvefz_n
** eason user Preauth Keys:**
c5765d7426fe55c005ffda74419ec38f9a32fd770fa13199
** 运行命令:**
tailscale up -login-server https://tailscale.bakeding.site -authkey c5765d7426fe55c005ffda74419ec38f9a32fd770fa13199 -accept-dns=false -accept-routes  --advertise-exit-node --reset
# 或者
tailscale up -login-server https://tailscale.bakeding.site -authkey c5765d7426fe55c005ffda74419ec38f9a32fd770fa13199 -accept-dns=false -accept-routes  --advertise-routes=10.9.0.0/24 --advertise-exit-node --reset
常用命令
tailscale netcheck
taiscale ping 100.100.0.1
tailscale status
tailscale switch eason
tailscale switch bakeding@126.com
wireguard配置
wg-easy 镜像docker安装
docker-compose.yml
services:
  wg-easy:
    container_name: wg-easy
    image: ghcr.io/wg-easy/wg-easy
    network_mode: bridge
    environment:
      - LANG=chs # or en, de ...
      - WG_HOST=43.136.104.74 #替换自己的服务器ip
      - PASSWORD=123456 # WebUI 登录密码(明文即可,容器会自动 bcrypt)
      #- PASSWORD_HASH=$$2a$$12$$S5L7nVgk6I7O/tdVLyVH0.QmD89RHJdKgHL8ayXOiGYwwFa4UmONC #PASSWORD和这一个密码用其中一个
      - LANG=chs# 可选:中文界面
      - WG_DEFAULT_DNS=192.168.2.1,114.114.114.114,8.8.8.8,8.8.4.4
      - PORT=51820 #可更改
      - WG_DEFAULT_ADDRESS=10.9.0.x
      - WG_PORT=51821 # 可选:自定义 WireGuard 端口
      - WG_PRE_UP = iptables -t nat -F; iptables -F;  # Flush all rules
      #- WG_POST_UP=iptables -A FORWARD -i %i -j ACCEPT; iptables -A FORWARD -o %i -j ACCEPT; iptables -t nat -A POSTROUTING -o eth0 -j MASQUERADE
      #- WG_POST_DOWN=iptables -D FORWARD -i %i -j ACCEPT; iptables -D FORWARD -o %i -j ACCEPT; iptables -t nat -D POSTROUTING -o eth0 -j MASQUERADE
      - WG_ALLOWED_IPS=114.114.114.114,8.8.8.8,8.8.4.4,192.168.2.0/24,10.9.0.0/24

      - UI_TRAFFIC_STATS=true
      - UI_CHART_TYPE=3 # (0 Charts disabled, 1 # Line chart, 2 # Area chart, 3 # Bar chart)
      # - WG_ENABLE_ONE_TIME_LINKS=true
      - UI_ENABLE_SORT_CLIENTS=true
      # - WG_ENABLE_EXPIRES_TIME=true
    volumes:
      - /home/ubuntu/work/wireguard:/etc/wireguard
    ports:
      - 51820:51820/tcp
      - 51821:51821/udp
    cap_add:
      - NET_ADMIN
      - SYS_MODULE
    sysctls:
      - net.ipv4.conf.all.src_valid_mark=1
      - net.ipv4.ip_forward=1
    restart: unless-stopped
必须知道的事情
PASSWORD_HASH
PASSWORD_HASH=$$2a$$12$$31H.ZEl74tEF98shuIWWxe2PTsljr3vEMRfU7HL8dPvNJTImcUgRq
这是密码为123456的哈希值,参见 How_to_generate_an_bcrypt_hash.md 来了解如何获取这个哈希值,当你登录到wg-easy配置web界面时,123456将是你的密码。但现在的方法有一点问题,所以可以用以下命令代替:
sudo docker run -it ghcr.io/wg-easy/wg-easy /app/wgpw.sh 123456
如果上述命令的输出是:
PASSWORD_HASH='$2a$12$31H.ZEl74tEF98shuIWWxe2PTsljr3vEMRfU7HL8dPvNJTImcUgRq'
因为我们使用的是docker-compose.yaml文件,需要将每个$符号替换为两个$$符号。所以在yaml中的PASSWORD_HASH应为:
PASSWORD_HASH=$$2a$$12$$31H.ZEl74tEF98shuIWWxe2PTsljr3vEMRfU7HL8dPvNJTImcUgRq
记得用一个更强的密码替换简单的123456。
关于我们使用的IP和IP范围的注释:
192.168.2.1 主机网络网关,请改为你的主机网络网关。
192.168.2.0/24 主机网络IP范围,请同样改为你的主机网络IP范围。
10.9.0.x 你的虚拟网络IP范围,除非你偏好其他的IP范围,否则不需要更改。
10.9.0.0/24 由 10.9.0.x 设定的虚拟网络IP范围。
手动安装
WireGuard是什么?
维基百科是这样描述的:
- WireGuard是一种实现加密虚拟专用网络(VPN) 的通信协议和免费开源软件,其设计目标是易于使用、高速性能和低攻击面;
- 它旨在比IPsec和OpenVPN这两种常见的隧道协议具有更好的性能和更强大的功能;
WireGuard 协议通过UDP传递流量。
通过描述,我们知道了wireguard其实就是一个FAST(速度快)、MODERN(流行)、SECURE (安全)的VPN TUNNEL(VPN隧道)。
安装前提条件
- 需要有公网的ip地址(这些地址可以直接在腾讯云、阿里云等厂商购买);
- 如果Linux内核版本<5.6,可能需要首先更新内核(本文下面有内核升级教程);
WireGuard的安装和使用条件非常苛刻,对内核版本要求极高,不仅如此,在不同的系统中,内核,内核源码包,内核头文件必须存在且这三者版本要一致。所以一般不建议在生成环境中安装,除非你对自己的操作很有把握。Red Hat、CentOS、Fedora等系统的内核,内核源码包,内核头文件包名分别为kernel、kernel-devel、kernel-headers,Debian、Ubuntu等系统的内核,内核源码包,内核头文件包名分别为kernel、linux-headers。
如果这三者任一条件不满足的话,则无法测试和安装 Wiregurad !
目前 WireGuard 已经被合并到 Linux 5.6 内核中了,如果你的内核版本 >= 5.6,就可以用上原生的 WireGuard 了,只需要安装 wireguard-tools 即可。例如,对于 Ubuntu 20.04 来说,它的内核版本是 5.4,虽然小于 5.6,但经过我的测试发现它已经将 WireGuard 合并到了内核中,我们只需要安装 wireguard-tools 即可。
安装WireGuard
教程中使用的系统为Ubuntu 24.04。
第0步:切换到root用户
sudo su
第一步:开启内核转发:
echo 1 > /proc/sys/net/ipv4/ip_forward
echo "net.ipv4.ip_forward = 1" >> /etc/sysctl.conf
sysctl -p
第二步:安装WireGuard
apt update
apt install wireguard -y
apt install resolvconf -y
第三步:验证是否安装成功
wg --version
正常来说应该可以看到类似下面的输出:
wireguard-tools v1.0.20210914 - https://git.zx2c4.com/wireguard-tools/
另外一种验证方式:
modprobe wireguard && lsmod | grep wireguard
输出如下:
wireguard              86016  0
curve25519_x86_64      36864  1 wireguard
libchacha20poly1305    16384  1 wireguard
libblake2s             16384  1 wireguard
ip6_udp_tunnel         16384  1 wireguard
udp_tunnel             24576  1 wireguard
libcurve25519_generic    49152  2 curve25519_x86_64,wireguard
配置WireGuard
cd /etc/wireguard
服务端配置
1、生成服务器私钥并将其保存在/etc/wireguard/server_private.key:
wg genkey | sudo tee /etc/wireguard/server_private.key
输出如下:
UOO//MO2GCC+5hHOz91YCP60/Zv/cnSskEH2j4eRPXo=
2、生成服务器公钥并将其保存在/etc/wireguard/server_public.key:
cat /etc/wireguard/server_private.key | wg pubkey | sudo tee /etc/wireguard/server_public.key
输出如下:
W+l7Uapd98bsNhN1g3Hs4iTCfKzcV03KNwhDPFgzqR4=
3、查看可用的服务器网络接口并验证主接口的详细信息
ip a
输出如下:
1: lo: <LOOPBACK,UP,LOWER_UP> mtu 65536 qdisc noqueue state UNKNOWN group default qlen 1000
    link/loopback 00:00:00:00:00:00 brd 00:00:00:00:00:00
    inet 127.0.0.1/8 scope host lo
       valid_lft forever preferred_lft forever
    inet6 ::1/128 scope host noprefixroute
       valid_lft forever preferred_lft forever
2: enp1s0: <BROADCAST,MULTICAST,UP,LOWER_UP> mtu 1500 qdisc pfifo_fast state UP group default qlen 1000
    link/ether 56:00:04:f8:7f:67 brd ff:ff:ff:ff:ff:ff
    inet 192.0.2.161/24 metric 100 brd 192.0.2.255 scope global dynamic enp1s0
       valid_lft 56853sec preferred_lft 56853sec
    inet6 2a05:0000:0000:000:5400:4ff:0000:7f67/64 scope global dynamic mngtmpaddr noprefixroute
       valid_lft 2591775sec preferred_lft 604575sec
    inet6 2a05:0000:0000:000:5400:4ff:0000:7f67/64 scope link
       valid_lft forever preferred_lft forever
根据描述信息可知道enp1s0是主公网接口,IP地址为192.0.2.161。WireGuard通过主公网接口将网络请求转换并转发到Internet。
4、生成服务端配置文件
echo "[Interface]
PrivateKey = $(cat server_private.key)
Address = 10.8.0.1/24
#如果你的服务器主网卡名称不是 enp1s0 ,那么请修改下面防火墙规则中最后的 enp1s0 为你的主网卡名称。
PostUp = ufw route allow in on wg0 out on enp1s0
PostUp = iptables -t nat -I POSTROUTING -o enp1s0 -j MASQUERADE
PreDown = ufw route delete allow in on wg0 out on enp1s0
PreDown = iptables -t nat -D POSTROUTING -o enp1s0 -j MASQUERADE
ListenPort = 51820
DNS = 8.8.8.8
MTU = 1420
"|sed '/^#/d;/^\s*$/d' > wg0.conf
ListenPort为端口号,可以设置成自己想使用的端口。
客户端配置(如需增加客户端,重复以下步骤即可)
1、生成客户端私钥:
wg genkey | sudo tee /etc/wireguard/client1_private.key
输出如下:
KBUxCUqNEJqN3DBO5xu2kiBQFT8Gv46Kkqu6OIKZu3Q=
2、生成客户端公钥:
cat /etc/wireguard/client1_private.key | wg pubkey | sudo tee /etc/wireguard/client1_public.key
输出如下:
xZB9I6953ebGqWVLCR7L6yJw7YJi0shJ+Sub9gfUFVU=
3、生成客户端配置文件:
[Interface]
PrivateKey = +B1l4bteT0URxs47VL7mSUJ6Gjp2yrXsxuzGWQBPSUo=
Address = 10.8.0.3/24
DNS = 114.114.114.114, 8.8.8.8, 8.8.4.4

[Peer]
PublicKey = rxdt0em+q2ST/ZJwrwiozT5TPCzIyfZbFj/1TPsN02c=
PresharedKey = INzSFYALzwr7o4yiOSaAB4xkHSD9MZiv7HCwt204dAQ=
AllowedIPs = 10.9.0.0/24
Endpoint = 43.136.104.74:51821
通过上述配置,客户端设备可以与WireGuard服务器建立新的VPN隧道,并通过隧道IP地址10.8.0.2访问internet。
4、打开WireGuard服务器配置,添加新的客户端
将xZB9I6953ebGqWVLCR7L6yJw7YJi0shJ+Sub9gfUFVU=替换为客户端公钥:
[Peer]
PublicKey = xZB9I6953ebGqWVLCR7L6yJw7YJi0shJ+Sub9gfUFVU=
AllowedIPs = 10.8.0.2/32
管理WireGuard服务(服务端、客户端命令相同)
1、启动WireGuard:
systemctl start wg-quick@wg0.service
或者
#启动
wg-quick up wg0
**注意:**文件名wg0.conf意味着wg0将是在客户端启动WireGuard连接的名字。可配置多个服务,根据/etc/wireguard/目录下配置文件名称来,wg0.confwei wg0服务,wg1.confwei wg1服务。
2、配置WireGuard开机启动:
systemctl enable wg-quick@wg0.service
3、查看WireGuard状态:
systemctl status wg-quick@wg0.service
正确输出如下:
● wg-quick@wg0.service - WireGuard via wg-quick(8) for wg0
     Loaded: loaded (/usr/lib/systemd/system/wg-quick@.service; disabled; preset: enabled)
     Active: active (exited) since Wed 2024-06-12 04:47:53 UTC; 38s ago
       Docs: man:wg-quick(8)
             man:wg(8)
             https://www.wireguard.com/
             https://www.wireguard.com/quickstart/
             https://git.zx2c4.com/wireguard-tools/about/src/man/wg-quick.8
             https://git.zx2c4.com/wireguard-tools/about/src/man/wg.8
    Process: 2384 ExecStart=/usr/bin/wg-quick up wg0 (code=exited, status=0/SUCCESS)
   Main PID: 2384 (code=exited, status=0/SUCCESS)
        CPU: 125ms
4、查看WireGuard虚拟网卡当前状态:
wg
或者
wg show wg0
输出如下:
interface: wg0
  public key: W+l7Uapd98bsNhN1g3Hs4iTCfKzcV03KNwhDPFgzqR4=
  private key: (hidden)
  listening port: 51820

peer: xZB9I6953ebGqWVLCR7L6yJw7YJi0shJ+Sub9gfUFVU=
  allowed ips: 10.8.0.2/32
5、停止WireGuard服务
wg-quick down wg0
测试配置
多台机器互ping即可:
ping -c 4 10.8.0.1
能ping通,说明WireGuard安装成功。
输出如下:
PING 10.8.0.1 (10.8.0.1) 56(84) bytes of data.
64 bytes from 10.8.0.1: icmp_seq=1 ttl=64 time=0.056 ms
64 bytes from 10.8.0.1: icmp_seq=2 ttl=64 time=0.076 ms
64 bytes from 10.8.0.1: icmp_seq=3 ttl=64 time=0.064 ms
64 bytes from 10.8.0.1: icmp_seq=4 ttl=64 time=0.065 ms

--- 10.8.0.1 ping statistics ---
4 packets transmitted, 4 received, 0% packet loss, time 3049ms
rtt min/avg/max/mdev = 0.056/0.065/0.076/0.007 ms
防火墙配置
默认情况下,Uncomplicated Firewall (UFW)在Ubuntu 24.04服务器上是激活的。这时需要配置防火墙允许在配置中指定的51820端口上进行网络连接。此外,还需要在服务器上开启端口转发功能,以便通过NAT (Network Address Translation)将来自WireGuard接口地址的网络请求转发到internet。
查看防火墙状态:
ufw status
当UFW状态为inactive时,执行如下命令允许SSH端口,并开启防火墙。
ufw allow 22 && sudo ufw enable
允许WireGuard接口UDP端口51820通过防火墙:
ufw allow 51820/udp
重新加载UFW
ufw reload
再次查看UFW状态:
ufw status
输出如下:
	Status: active

    To                         Action      From

    22/tcp                     ALLOW       Anywhere
    51820/udp                  ALLOW       Anywhere
    22/tcp (v6)                ALLOW       Anywhere (v6)
    51820/udp (v6)             ALLOW       Anywhere (v6)

    Anywhere on enp1s0         ALLOW FWD   Anywhere on wg0
    Anywhere (v6) on enp1s0    ALLOW FWD   Anywhere (v6) on wg0
配置iptables规则:
iptables -t nat -A POSTROUTING -s 10.8.0.0/24 -o enp1s0 -j MASQUERADE
注意将enp1s0改成自己的网卡。
保存规则:
iptables-save | sudo tee /etc/iptables/rules.v4
使用 Certbot 获取免费 HTTPS 证书
为什么选择 Certbot 和 Let’s Encrypt?
Let’s Encrypt 是一个由非营利组织 ISRG 提供的免费证书颁发机构,Certbot 则是其官方推荐的自动化工具。它们的核心优势包括:
- 免费:无需支付证书费用。
- 自动化:Certbot 提供自动获取和续期证书的功能。
- 开源:社区支持广泛,兼容多种服务器环境。
- 快速:几分钟即可完成配置。
无论你是运行一个个人博客还是小型商业网站,Certbot 都能帮你快速实现 HTTPS。
前置条件
在开始之前,请确保你已准备好以下内容:
- 一个域名:已解析到你的服务器 IP。
- 服务器环境:支持 Linux(如 Ubuntu、CentOS)或类似系统。
- Web 服务器:已安装 Nginx 或 Apache。
- 管理员权限:需要 root 或 sudo 权限来执行命令。
本文以 Ubuntu 20.04 和 Nginx 为例,其他环境配置类似,可参考 Certbot 官网。
配置流程
下面是使用 Certbot 获取和配置 HTTPS 证书的完整流程。整个过程可以分为五个步骤:
准备服务器和域名
安装 Certbot
获取 HTTPS 证书
配置 Web 服务器
设置自动续期
步骤 1:安装 Certbot
Certbot 的安装非常简单,推荐使用 snap 安装方式,因为它能确保获取最新版本。
在 Ubuntu 系统上,运行以下命令:
sudo snap install core; sudo snap refresh core
sudo snap install --classic certbot
sudo ln -s /snap/bin/certbot /usr/bin/certbot
验证安装是否成功:
certbot --version
输出类似 certbot 2.x.x 说明安装完成。
步骤 2:获取 HTTPS 证书
Certbot 支持多种验证方式,这里我们使用 --nginx 插件(适用于 Nginx 用户),它会自动验证域名并修改 Nginx 配置。如果你是 Apache 用户,可以替换为 --apache。
运行以下命令:
sudo certbot --nginx -d yourdomain.com -d www.yourdomain.com
sudo certbot --nginx --nginx-server-root=/www/server/nginx/conf -d easytribe.bakeding.site
-d指定需要 HTTPS 的域名,可以多次使用以支持多个子域名。- Certbot 会通过 HTTP-01 挑战验证域名所有权,确保你的域名指向当前服务器。
执行过程中,Certbot 会提示你输入邮箱(用于续期通知)和同意服务条款。完成后,证书将存储在 /etc/letsencrypt/live/yourdomain.com/ 目录下。
步骤 3:配置 Web 服务器
如果你使用 --nginx 插件,Certbot 会自动修改 Nginx 配置文件,添加 HTTPS 支持。你可以检查配置文件(通常在 /etc/nginx/sites-available/):
server {
    listen 80;
    server_name yourdomain.com www.yourdomain.com;
    return 301 https://$host$request_uri;
}

server {
    listen 443 ssl;
    server_name yourdomain.com www.yourdomain.com;

    ssl_certificate /etc/letsencrypt/live/yourdomain.com/fullchain.pem;
    ssl_certificate_key /etc/letsencrypt/live/yourdomain.com/privkey.pem;

    # 其他配置...
}
如果 Certbot 未自动配置,你需要手动添加上述 HTTPS server 块,并重启 Nginx:
sudo nginx -t
sudo systemctl reload nginx
步骤 4:测试 HTTPS
在浏览器中访问 https://yourdomain.com,检查是否加载正常。你也可以使用在线工具(如 SSL Labs 的 SSL Server Test)检查证书状态。
步骤 5:设置自动续期
Let’s Encrypt 证书有效期为 90 天,Certbot 提供自动续期功能。测试自动续期是否正常工作:
sudo certbot renew --dry-run
如果没有报错,说明续期配置正常。Certbot 默认会通过 cron 或 systemd 定时任务自动续期。你可以查看 systemd 定时任务:
sudo systemctl status snap.certbot.renew.service
确保服务是启用状态,通常 Certbot 会每天尝试续期。
常见问题与解决方案
-
“DNS 解析错误”怎么办?
确保域名已正确解析到服务器 IP。使用
dig yourdomain.com或nslookup检查 DNS 状态。 -
Nginx 配置未自动更新?
手动检查
/etc/letsencrypt/live/yourdomain.com/下的证书路径,并更新 Nginx 配置文件。 -
续期失败?
检查服务器是否允许 80 端口访问,Let’s Encrypt 需要通过 HTTP 验证续期。
-
多域名支持?
在获取证书时,添加多个
-d参数,如-d yourdomain.com -d www.yourdomain.com -d api.yourdomain.com。
小贴士
- 备份证书:定期备份
/etc/letsencrypt/目录,避免意外丢失。 - 强制 HTTPS:在 Nginx 配置中添加 301 重定向,确保所有 HTTP 流量跳转到 HTTPS。
- 监控续期:可以通过邮件通知或脚本监控续期状态。
总结
通过 Certbot 和 Let’s Encrypt,任何人都能轻松为网站启用 HTTPS。整个过程简单高效,从安装到配置只需几分钟,且自动续期功能让维护变得无忧。希望这篇教程能帮你快速上手 HTTPS 配置,让你的网站更安全、更专业!
如果有任何问题,欢迎在评论区交流,或者访问 Certbot 官网 获取更多帮助。 使用 Certbot 获取免费 HTTPS 证书:从零开始的 HTTPS 配置指南- 使用 Let’s Encrypt 免费申请泛域名 SSL 证书,并实现自动续期
NAS
Windows 设置 Syncthing 开机自启动
- 保存 syncthing.bat 脚本文件
# 打开 “记事本” 软件,将以下代码复制进去,另存为 syncthing.bat。
start "Syncthing" syncthing.exe -no-console -no-browser
- 复制脚本文件到 syncthing.exe 同级目录
找到 syncthing.exe 所在目录,将 syncthing.bat 脚本文件复制到该目录。
-
将脚本文件快捷方式添加到 “启动” 菜单
- 选中 syncthing.bat 脚本文件,右键创建快捷方式
- 按下 win + R,输入 “shell:startup” 打开 “启动” 文件夹
- 将快捷方式复制到 “启动” 文件夹
Windows 设置 Syncthing 开机自启动
## 安装wireguard
首先,打开系统-软件包,先更新列表,然后搜索wireguard,安装luci-app-wireguard,会把其他的依赖一起安装上
```shell
kmod-wireguard
luci-app-wireguard
luci-i18n-wireguard-zh-cn
luci-proto-wireguard
wg-installer-server
wg-installer-server-hotplug-babeld
wg-installer-server-hotplug-olsrd
wireguard-tools
```
重启系统
## 路由器设置防火墙
两台路由器上都要设置,首先新建一个防火墙区域(网络-防火墙-常规设置-区域),名称自取wg0,入站数据、出站数据、转发都填接受,打开MSS钳制
再设置一条通行规则(网络-防火墙-通行规则),协议填UDP,源区域填wan,目标区域填设备,目标端口填wg端口(稍后会在接口中设置,保持一致)
## 在有公网IP的路由器上新建一个wg接口
新建一个接口(网络-接口),名称wireguard
根据这个配置文件来设置
设置防火墙规则为刚刚新建的防火墙规则。
```shell
[Interface]
PrivateKey = UDhHq+Krx637r7ZyhG7r0aV7/yphpZL8whQLnChMu1g=
Address = 10.8.0.7/24
DNS = 1.1.1.1
[Peer]
PublicKey = buRZW8bjRTzxT4FDWd5PIs4qTgbnYqnwPbyM/ZlcaA4=
PresharedKey = jFvJ827OTqN+KVH/5WxEq9QKN8qhyK992nQ1dkF9+fQ=
AllowedIPs = 0.0.0.0/0, ::/0
PersistentKeepalive = 0
Endpoint = 106.15.137.139:51820
```
iStoreOS配置tailscale——局域网访问和科学上网
参考地址:在 Linux 系统上安装与配置 Tailscale:完整指南
1.在iStoreOS 商店里安装好 tailscale软件包
或者手动安装:
- 开源项目地址:【点击进入】
wget https://github.com/adyanth/openwrt-tailscale-enabler/releases/download/v1.60.0-e428948-autoupdate/openwrt-tailscale-enabler-v1.60.0-e428948-autoupdate.tgz
openwrt-tailscale-enabler-v1.60.0-e428948-autoupdate.tgz#可以根据实际情况替换最新的
- 解压软件包
tar x -zvC / -f openwrt-tailscale-enabler-v1.60.0-e428948-autoupdate.tgz
openwrt-tailscale-enabler-v1.60.0-e428948-autoupdate.tgz #要和上一步一致
- 安装依赖包
 opkg update
 opkg install libustream-openssl ca-bundle kmod-tun
- 设置开机自启并验证
    /etc/init.d/tailscale enable
    ls /etc/rc.d/S*tailscale*
- 启动Tailscale
/etc/init.d/tailscale start
2. 启动终端输入命令
tailscale up
3. 点击命令提示的网址链接,登录tailscale激活设备
4. 开启子网网路由
在Tailscale的管理页面上,单击设备列表右侧的更多图标,禁用密钥过期,并打开子网路由。在终端中输入命令
tailscale up --advertise-routes=192.168.2.0/24 --accept-routes --accept-dns=false --advertise-exit-node --reset
如果是使用headscale搭建的,可以用下面的命令
tailscale up --login-server=http://服务器IP:headscale端口 --advertise-routes=192.168.2.0/24 --accept-routes=true --accept-dns=false --reset
账号切换
curl -fsSL https://pkgs.tailscale.com/stable/ubuntu/noble.noarmor.gpg | sudo tee /usr/share/keyrings/tailscale-archive-keyring.gpg >/dev/null
curl -fsSL https://pkgs.tailscale.com/stable/ubuntu/noble.tailscale-keyring.list | sudo tee /etc/apt/sources.list.d/tailscale.list
如果要切换账号 运行
tailscale down
运行
ps -ef | grep tailscale
找到对应进程号pid,运行
kill -TERM pid
删除/volume1/@appdata/Tailscale下所有文件, 然后卸载tailscale
sudo apt-get remove tailscale
重新安装tailscale套件
sudo apt-get install tailscale
运行命令行:
sudo tailscale up --accept-routes --advertise-routes=10.9.0.0/24 --accept-dns=false  --advertise-exit-node --reset
sudo tailscale up --accept-routes --advertise-routes=10.9.0.0/24 --advertise-exit-node --reset
sudo tailscale up --accept-routes --advertise-exit-node --reset
sudo tailscale up --accept-routes --reset
sudo tailscale up --accept-routes --advertise-routes=10.8.0.0/24 --accept-dns=false  --advertise-exit-node --netfilter-mode=off
群晖安装 WireGuard(客户端Client)教程
一、首先需要部署一个WireGuard服务
在套件中心添加“套件来源”,这里我选的是“我不是矿神” 单击“套件中心” 点“设置” 点“套件来源” 点“新增” 输入名称“自定义名称”及位置“https://spk7.imnks.com/”
二、从“社群”安装Wireguard套件
三、通过SSH登录并进行进一步操作
-
赋予Wireguard套件权限
sudo sed -i 's/package/root/g' /var/packages/WireGuard/conf/privilege
-
在etc目录下创建wireguard文件夹
mkdir /etc/wireguard/
-
进入Wireguard文件夹
cd /etc/wireguard/
-
生成私钥和公钥(配置文件时需要用到)
    “wg genkey > server\_privateKey” #生成服务器端私钥
    “wg pubkey < server\_privateKey > server\_publicKey”#生成服务器端私钥对应的公钥
    “wg genkey | tee client\_privateKey | wg pubkey > client\_publicKey” #生成客户端私钥及对应的公钥
    “cat server\_privateKey”#显示服务器端私钥
    “cat server\_publicKey”#显示服务器端公钥
    “cat client\_privateKey”#显示客户器端私钥
    “cat client\_publicKey”#显示客户器端公钥
复制好这些秘钥,下面配置文件时需要用到。
-
网卡查询(配置文件可能用到)
“ifconfig”#这里“eth0”&“eth1”分别对应NAS网口1和网口2,按自己插的网口查看即可。 -
编辑Client端Wireguard配置文件
vi client.conf 或者 vi wg0.conf(便于区分在这里用了"client.conf") 按“i键”可以进行编辑,修改文本并复制内容后粘贴即可 按“Esc键”结束编辑 输入“:wq”保存并退出 #注意前面有“冒号:”
    [Interface]
    PrivateKey =                             #客户端私钥
    Address = 10.8.0.3/24                    #地址可以自定义
    PostUp = ping -c 1 10.8.0.1; sleep 3     #检测IP是否可ping通,如果ping不同则无法开启

    [Peer]
    PublicKey =                              #服务端公钥
    AllowedIPs = 10.8.0.0/24, 192.68.2.1/32   #服务端允许地址(前面地址必须写"10.8.0.3"同网段IP)
    PersistentKeepalive = 25                 #间隔时间25秒
    Endpoint = IP地址:51821                  #IP地址:服务器设置的端口号”
-
启动“wg0.conf”配置
sudo wg-quick up wg0   #启动,执行这一条即可
sudo wg-quick down wg0 #关闭,这一条调试时可以再用
-
查看连接状态
“sudo wg show wg0”#或者直接输入“wg”也可以
interface: wg0
public key: #客户端公钥
private key: (hidden) #客户端私钥显示隐藏
peer: #服务端公钥
endpoint: #服务端IP及端口号
allowed ips: 10.8.0.0/24,  192.68.2.1/32 #服务端访问NAS的虚拟IP地址
-
设置开机自启动
sudo wg-autostart enable wg0  #开机自启动,执行这一条即可
sudo wg-autostart disable wg0 #关闭自启动
正常是这样的,不过大部分设置完之后可能会出现无法ping通即Transfer中有发送数据,没有接收数据的情况.
另外一种方式
配置文件在/etc/wireguard/
[Interface]
PrivateKey = qHONQCLb6bcnrPG1d6tGCTrdoXZuAsAqPKYWMV5DNXU=
Address = 10.8.0.9/24
DNS = 1.1.1.1

[Peer]
PublicKey = buRZW8bjRTzxT4FDWd5PIs4qTgbnYqnwPbyM/ZlcaA4=
PresharedKey = GfnOox1CuaCBD9EIPEqkfzJyIa+djNIaOeDV1GySiD8=
AllowedIPs = 10.8.0.0/24
Endpoint = 106.15.137.139:51820
启动“wg0.conf”配置
sudo wg-quick up wg0   #启动,执行这一条即可
sudo wg-quick down wg0 #关闭,这一条调试时可以再用
群晖docker-compose安装paperless文档归档管理系统
https://chochol.io/en/software/paperless-installation-guide-for-synology-on-docker-compose/ https://post.smzdm.com/p/a6p3r0ge/ 依次创建如下目录:
- consume
- data
- export
- media
- pgdata
- redisdata
docker-compose文件
version: "3.4"

services:

  broker:
    image: library/redis:7
    restart: unless-stopped
    container_name: redis7
    ports:
      - "6379:6379"
    volumes:
      - /volume1/docker/paperless-ngx/redisdata:/data

  db:
    image: library/postgres:15
    container_name: postgres15
    restart: unless-stopped
    volumes:
      - /volume1/docker/paperless-ngx/pgdata:/var/lib/postgresql/data
    environment:
      POSTGRES_DB: paperless
      POSTGRES_USER: eason
      POSTGRES_PASSWORD: xw210516

  webserver:
    image: paperlessngx/paperless-ngx:latest
    container_name: paperless-ngx
    restart: unless-stopped
    depends_on:
      - db
      - broker
      - gotenberg
      - tika
    ports:
      - "38000:8000"
    healthcheck:
      test: ["CMD", "curl", "-fs", "-S", "--max-time", "2", "http://localhost:8000"]
      interval: 30s
      timeout: 10s
      retries: 5
    volumes:
      - /volume1/docker/paperless-ngx/data:/usr/src/paperless/data
      - /volume1/docker/paperless-ngx/media:/usr/src/paperless/media
      - /volume1/docker/paperless-ngx/export:/usr/src/paperless/export
      - /volume1/docker/paperless-ngx/consume:/usr/src/paperless/consume
    environment:
      PAPERLESS_REDIS: redis://broker:6379
      PAPERLESS_DBHOST: db
      PAPERLESS_DBUSER: eason
      PAPERLESS_DBPASS: xw210516
      PAPERLESS_DBPORT: 5432
      PAPERLESS_TIKA_ENABLED: 1
      PAPERLESS_TIKA_GOTENBERG_ENDPOINT: http://gotenberg:3000
      PAPERLESS_TIKA_ENDPOINT: http://tika:9998
      PAPERLESS_OCR_LANGUAGES: chi-sim chi-tra
      PAPERLESS_OCR_LANGUAGE: eng+chi_sim
      USERMAP_UID: 0
      USERMAP_GID: 0
      PAPERLESS_TIME_ZONE: Asia/Shanghai
      PAPERLESS_ADMIN_USER: eason
      PAPERLESS_ADMIN_PASSWORD: 210516
      PAPERLESS_ADMIN_MAIL: bakeding@126.com
    dns:
      - 8.8.8.8
      - 8.8.4.4

  gotenberg:
    image: gotenberg/gotenberg:7.10
    container_name: gotenberg710
    ports:
      - "38001:3000"
    restart: unless-stopped
    command:
      - "gotenberg"
      - "--chromium-disable-javascript=true"
      - "--chromium-allow-list=file:///tmp/.*"

  tika:
    image: apache/tika:latest
    container_name: tika
    ports:
      - "9998:9998"
    restart: unless-stopped
docker安装个人在线书库calibre
docker pull johngong/calibre-web
docker run -d \
--name=calibre \
-e PUID=0 \
-e PGID=0 \
-e TZ=Asia/Shanghai \
-p 51631:8083 \
-v /volume1/docker/calibre/book:/library \
-v /volume1/docker/calibre/config:/config \
-e DOCKER_MODS=linuxserver/calibre-web:calibre \
-e CALIBRE_SERVER_WEB_LANGUAGE=zh_CN \
--restart unless-stopped \
johngong/calibre-web
| 本地路径 | 容器路径 | 说明 |
|---|---|---|
| /volume1/docker/calibre/book | /library | 可能需要一个初始metadata.db文件,如果第一次使用可以从这下载一个空的:https://gitee.com/qs/calibre-web-douban-api/blob/main/tests/metadata.db |
| /volume1/docker/calibre/config | /config | 配置目录 |
或者用docker-compose
version: "3.1"
services:
  calibre-web:
    image: johngong/calibre-web
    container_name: calibre-web
    environment:
      - UID=0
      - GID=0
      - USER=eason
      - PASSWORD=123456
      - TZ=Asia/Shanghai
    volumes:
      - /volume1/docker/calibre/config:/config
      - /volume1/docker/calibre/books:/library
      - /volume1/docker/calibre/autoaddbooks:/autoaddbooks
      - /volume1/docker/calibre/addin:/usr/local/calibre-web/app/cps/metadata_provider
    ports:
      - 51630:8083
      - 51631:8080
    restart: unless-stopped
推荐静读天下安卓客户端
python及pip安装
pip安装
python -m ensurepip
python -m pip install --upgrade pip
或者
wget https://bootstrap.pypa.io/get-pip.py
python get-pip.py
以上指令执行完成后,可以用pip --version检查pip安装情况。
为了提高pip的运行速度,建议执行以下指令,把pip源更改为国内镜像源。
sudo pip config set global.index-url https://pypi.tuna.tsinghua.edu.cn/simple/
创建项目并启用虚拟环境
创建虚拟环境:进入以上目录,执行
python -m venv /volume1/web/venv/python38_env
激活虚拟环境:
source /volume1/web/venv/python38_env/bin/activate
pip卸载
python -m pip uninstall pip
nginx反向代理emqx
1. docker部署emqx
services:
  emqx:
    image: emqx/emqx:5.10.0
    container_name: emqx4
    privileged: true
    #restart: always
    environment:
       - "EMQX_NODE_NAME=emqx@node1.emqx.io"
       - "EMQX_CLUSTER__DISCOVERY_STRATEGY=static"
    healthcheck:
      test: ["CMD", "/opt/emqx/bin/emqx", "ctl", "status"]
      interval: 5s
      timeout: 25s
      retries: 5
    networks:
      emqx-bridge:
        aliases:
         - node1.emqx.io
    ports:
      - 1883:1883
      - 8083:8083
      - 8084:8084
      - 8883:8883
      - 18083:18083
    volumes:
#      - /volume1/docker/emqx/data:/opt/emqx/data
      - /volume1/docker/emqx/emqx4/emqx.conf:/opt/emqx/opt/etc/emqx.conf
      - /volume1/docker/emqx/log:/opt/emqx/log

networks:
  emqx-bridge:
    driver: bridge
2. nginx配置文件
nginx.conf文件:
user  www www;
worker_processes auto;
error_log  /www/wwwlogs/nginx_error.log  crit;
pid        /www/server/nginx/logs/nginx.pid;
worker_rlimit_nofile 51200;

stream {
  # 定义日志格式
    log_format tcp_format '$time_local|$remote_addr|$protocol|$status|$bytes_sent|$bytes_received|$session_time|$upstream_addr|$upstream_bytes_sent|$upstream_bytes_received|$upstream_connect_time';
    allow  all;

    access_log /home/eason/dywl/nginx/log/tcp-access.log tcp_format;
    error_log /home/eason/dywl/nginx/log/tcp-error.log;
    #include /www/server/panel/vhost/nginx/tcp/*.conf;
    include /home/eason/dywl/nginx/bt-conf/tcp/*.conf;
}

events
    {
        use epoll;
        worker_connections 51200;
        multi_accept on;
    }

http
    {
        include       mime.types;
		#include luawaf.conf;

		include proxy.conf;
        lua_package_path "/www/server/nginx/lib/lua/?.lua;;";

        default_type  application/octet-stream;

        server_names_hash_bucket_size 512;
        client_header_buffer_size 32k;
        large_client_header_buffers 4 32k;
        client_max_body_size 50m;

        sendfile   on;
        tcp_nopush on;

        keepalive_timeout 60;

        tcp_nodelay on;

        fastcgi_connect_timeout 300;
        fastcgi_send_timeout 300;
        fastcgi_read_timeout 300;
        fastcgi_buffer_size 64k;
        fastcgi_buffers 4 64k;
        fastcgi_busy_buffers_size 128k;
        fastcgi_temp_file_write_size 256k;
		fastcgi_intercept_errors on;

        gzip on;
        gzip_min_length  1k;
        gzip_buffers     4 16k;
        gzip_http_version 1.1;
        gzip_comp_level 5;
        gzip_types     text/plain application/javascript application/x-javascript text/javascript text/css application/xml application/json image/jpeg image/gif image/png font/ttf font/otf image/svg+xml application/xml+rss text/x-js;
        gzip_vary on;
        gzip_proxied   expired no-cache no-store private auth;
        gzip_disable   "MSIE [1-6]\.";

        limit_conn_zone $binary_remote_addr zone=perip:10m;
		limit_conn_zone $server_name zone=perserver:10m;

        server_tokens off;
        access_log off;


include /www/server/panel/vhost/nginx/*.conf;
include /home/eason/dywl/nginx/bt-conf/*.conf;
}
tcp.mqtt.conf放在文件夹/home/eason/dywl/nginx/bt-conf/tcp下
# MQTT TCP 代理 (1883)
server {
	listen 1883;
	proxy_pass 10.8.0.4:1883;
	#proxy_protocol on;                 # 开启 PROXY 协议传递真实 IP
    #proxy_bind $remote_addr transparent;  # 绑定真实I
	proxy_connect_timeout 10s;
	proxy_timeout 1800s;               # 默认心跳时间
	proxy_buffer_size 3M;
	tcp_nodelay on;
	access_log /home/eason/dywl/nginx/log/mqtt_tcp_access.log tcp_format;
	error_log /home/eason/dywl/nginx/log/mqtt_tcp_error.log;
}
emqx界面中配置
以上是透传模式。
如果采用代理模式,需要配置#proxy_protocol on配置项开启,则需要配置下面设置,这个时候mqttx连接不上emqx
管理——监听器
代理协议修改为true
使用 NGINX 反向代理 EMQX 时获取客户端真实 IP | EMQ
群晖 VSCode Remote 配置
1. 客户端 VSCode 安装 Remote 插件
安装插件 略
添加远程连接 aaa@192.168.1.xxx, 连接、等待, 输入密码
2. 连接时可能连不上,并出现警告
警告:
The remote host may not meet VS Code Server's prerequisitesfor glibc and libstdc++
Image
这个警告实际上不用管它。 我在这个问题上卡了很久。。。
3. 连不上的真实原因
原因:群晖考虑安全性默认禁止了TCP转发,即配置文件里AllowTcpForwarding的默认值为: "no"
解决方法: 通过ssh 连接群晖, 编辑 /etc/ssh/[sshd_config](https://zhida.zhihu.com/search?content_id=231556274&content_type=Article&match_order=1&q=sshd_config&zd_token=eyJhbGciOiJIUzI1NiIsInR5cCI6IkpXVCJ9.eyJpc3MiOiJ6aGlkYV9zZXJ2ZXIiLCJleHAiOjE3NTg0MjgxMTUsInEiOiJzc2hkX2NvbmZpZyIsInpoaWRhX3NvdXJjZSI6ImVudGl0eSIsImNvbnRlbnRfaWQiOjIzMTU1NjI3NCwiY29udGVudF90eXBlIjoiQXJ0aWNsZSIsIm1hdGNoX29yZGVyIjoxLCJ6ZF90b2tlbiI6bnVsbH0.OE_c58fNOMlVjyc3gVKUdM5PntZrogrA_i4WmQzShV8&zhida_source=entity) 文件,修改:
# AllowTcpForwarding no
AllowTcpForwarding yes
保存后重启群晖。
群晖mail server配置邮箱服务器(通过阿里云中继)
##1.群晖安装mail station和mail server
1.1 配置mail server
去掉勾选spf验证,使用阿里云反向代理转发,勾选的话需要在阿里云安装Postfix并配置
##2.配置阿里云反向代理
###2.1 使用tcp反向代理,新建tcp.mail.conf
配置25 143 587 995 110 465 993这几个端口
# 统一声明证书(可放在 stream 顶层,所有 ssl 端口共享同一套证书)
ssl_certificate     /home/eason/dywl/nginx/ssl/tencent/mail.bakeding.site_bundle.pem;
ssl_certificate_key /home/eason/dywl/nginx/ssl/tencent/mail.bakeding.site.key;

# ---------- SMTPS(465) ----------
upstream smtps_backend { server 10.8.0.4:465; }
server {
	listen 465 ssl;                 # 必须保留 ssl
	proxy_pass smtps_backend;
	# 可选:开启 TLS 预读(用于 SNI 识别)
	# ssl_preread on;
	access_log /home/eason/dywl/nginx/log/mqtt_tcp_access.log tcp_format;
	error_log /home/eason/dywl/nginx/log/mqtt_tcp_error.log;
}

# ---------- SMTPS(587) ----------
upstream smtps587_backend { server 10.8.0.4:587; }
server {
	listen 587 ssl;                 # 必须保留 ssl
	proxy_pass smtps587_backend;
	# 可选:开启 TLS 预读(用于 SNI 识别)
	# ssl_preread on;
	access_log /home/eason/dywl/nginx/log/mqtt_tcp_access.log tcp_format;
	error_log /home/eason/dywl/nginx/log/mqtt_tcp_error.log;
}

# ---------- IMAPS(993) ----------
upstream imaps_backend { server 10.8.0.4:993; }
server {
	listen 993 ssl;
	proxy_pass imaps_backend;
	access_log /home/eason/dywl/nginx/log/mqtt_tcp_access.log tcp_format;
	error_log /home/eason/dywl/nginx/log/mqtt_tcp_error.log;
}

# ---------- POP3S(995) ----------
upstream pop3s_backend { server 10.8.0.4:995; }
server {
	listen 995 ssl;
	proxy_pass pop3s_backend;
	access_log /home/eason/dywl/nginx/log/mqtt_tcp_access.log tcp_format;
	error_log /home/eason/dywl/nginx/log/mqtt_tcp_error.log;
}

# ---------- 仍保留明文端口(可选) ----------
upstream smtp_backend { server 10.8.0.4:25; }
server {
	listen 25;
	proxy_pass smtp_backend;

	access_log /home/eason/dywl/nginx/log/mqtt_tcp_access.log tcp_format;
	error_log /home/eason/dywl/nginx/log/mqtt_tcp_error.log;
}
upstream imap_backend { server 10.8.0.4:143; }
server {
	listen 143;
	proxy_pass imap_backend;
	access_log /home/eason/dywl/nginx/log/mqtt_tcp_access.log tcp_format;
	error_log /home/eason/dywl/nginx/log/mqtt_tcp_error.log;
}
upstream pop3_backend { server 10.8.0.4:110; }
server {
	listen 110;
	proxy_pass pop3_backend;
	access_log /home/eason/dywl/nginx/log/mqtt_tcp_access.log tcp_format;
	error_log /home/eason/dywl/nginx/log/mqtt_tcp_error.log;
}
###2.2 配置mail网页 配置mail网页,可以通过mail.bakeding.site网页访问邮箱 新建nginx.mail.conf
server {
	listen       80;	#监听80端口
	listen  [::]:80;
	server_name  mail.bakeding.site;		#也可以填写自己注册的域名
	access_log /home/eason/dywl/nginx/log/mail.log;

	location / {
        proxy_pass http://10.8.0.4/mail/;
        proxy_set_header Host $host;
        proxy_set_header X-Real-IP $remote_addr;
        proxy_set_header X-Forwarded-For $proxy_add_x_forwarded_for;
        proxy_set_header X-Forwarded-Proto $scheme;

        # 处理Vue路由的SPA重定向
        proxy_intercept_errors on;
        error_page 404 = /mail/index.html;
    }

    #error_page  404              /404.html;
    # redirect server error pages to the static page /50x.html
    #
    error_page   500 502 503 504  /50x.html;		#错误页面设置
    location = /50x.html {
        root   /home/eason/dywl/nginx/html;
    }
}


server {
    listen 443 ssl ;
    server_name mail.bakeding.site;  # 替换为实际域名
	access_log $log_dir/easytribe443.log;

    # SSL 证书配置(需要替换为实际证书路径)
    ssl_certificate /home/eason/dywl/nginx/ssl/tencent/mail.bakeding.site_bundle.pem;
    ssl_certificate_key /home/eason/dywl/nginx/ssl/tencent/mail.bakeding.site.key;

    # SSL 配置
    ssl_protocols TLSv1.2 TLSv1.3;
    ssl_ciphers ECDHE-RSA-AES128-GCM-SHA256:ECDHE-RSA-AES256-GCM-SHA384;
    ssl_prefer_server_ciphers off;

    # 复用上面的配置
    location / {
        proxy_pass http://10.8.0.4/mail/;
        proxy_set_header Host $host;
        proxy_set_header X-Real-IP $remote_addr;
        proxy_set_header X-Forwarded-For $proxy_add_x_forwarded_for;
        proxy_set_header X-Forwarded-Proto $scheme;

        # 处理Vue路由的SPA重定向
        proxy_intercept_errors on;
        error_page 404 = /mail/index.html;
    }

}
##3. 域名配置(腾讯云bakeding.site)
首先添加MX记录,记录类型为MX,记录值为mail.bakeding.site,主机记录为@
配置SPF。添加如下记录,记录类型为TXT,记录值为v=spf1 mx -all,主机记录为@
配置DKIM。添加如下记录,记录类型为TXT,记录值为v=DKIM1; k=rsa; p=密钥,主机记录为mail._domainkey,这里的密钥是前面通过mail前缀生成的(1.1中的配置)
dmarc添加txt解析为:主机记录: _dmarc 记录值:v=DMARC1; p=reject; rua=bakeding@126.com
(其中p后参数自己根据情况设置,有none , quarantine 和 reject三种,rua后邮箱是自己接收报告邮箱)
##4. 网易邮箱大师客户端配置
openwrt 如何正确设置ksmbd
在luci界面 系统=》软件包 里安装 ksmbd-utils,然后ssh登录
ksmbd.adduser -a 你想用户名 -p 你想设置的密码
ksmbd.adduser --add root -p 你想设置的密码
这样你就创建了ksmbd内的用户。 接下去回到luci界面,路径填写/mnt/sda1,勾选强制 root(意思是,刚才创建的ksmbd用户登录时,ksmbd将以系统root用户身份来操作文件),这里特别注意把“允许用户”框框空着不要填乱七八糟的东西。
路由器
openwrt 如何正确设置ksmbd
在luci界面 系统=》软件包 里安装 ksmbd-utils,然后ssh登录
ksmbd.adduser -a 你想用户名 -p 你想设置的密码
这样你就创建了ksmbd内的用户。 接下去回到luci界面,路径填写/mnt/sda1,勾选强制 root(意思是,刚才创建的ksmbd用户登录时,ksmbd将以系统root用户身份来操作文件),这里特别注意把“允许用户”框框空着不要填乱七八糟的东西。
管理工具
推荐工具
base64_Investigation on the corrosion resistance of epoxy resin coatings modified by high-entropy oxides
Investigation on the corrosion resistance of epoxy resin coatings modified by high-entropy oxides
Boxin Yan1, Chao Wang1,2, Yihui Liu1
1Hubei Key Laboratory of Advanced Technology for Automotive Components & Hubei Collaborative Innovation Center for Automotive Components Technology, Wuhan University of Technology, Wuhan, Hubei, 430070, China
2Corresponding author’s e-mail: wchao@whut.edu.cn
Abstract: High-entropy oxides, as an emerging class of ceramic materials, exhibit exceptional high-temperature stability, superior corrosion resistance, and excellent hardness and strength, rendering them promising candidates for surface protection applications. In this study, high-entropy oxide filler Y2(Ti0.2Zr0.2Hf0.2Ce0.2V0.2)2O7 was synthesized via solid-state reaction and incorporated as a nanofiller to modify epoxy resin, thereby fabricating composite coatings. The influence of varying high-entropy oxide contents on the anticorrosion performance of the composite coatings was systematically investigated, and the underlying corrosion protection mechanism of the high-entropy oxide-modified epoxy coatings was elucidated. The results demonstrate that the composite coatings incorporating high-entropy oxide exhibit outstanding anticorrosion properties, with a corrosion inhibition efficiency of 99.39% derived from polarization curve analysis. Even after immersion in 3.5wt% NaCl solution for 10 days, the corrosion inhibition efficiency remained at 95.57%. Impedance efficiency, as determined from Nyquist plots, reached 98.63%, and retained 91.75% after 10 days of immersion.
1. Introduction
Metallic materials play a crucial role in industrial development. Their corrosion not only affects the national economy and personal safety, but also poses significant environmental impacts. Among existing strategies, applying protective coatings on metal surfaces is currently one of the most widely used and effective corrosion-prevention approaches [1]. However, traditional organic coatings often fail to meet the demands of modern industry, and the incorporation of functional anticorrosive fillers has proven to be an effective method to enhance coating performance [2].
One-dimensional nanomaterials exhibit size-dependent effects [3] and barrier properties, which can effectively improve the performance of epoxy coatings by mitigating microcracks and voids formed during the curing process [4]. High-entropy oxides represent a novel class of ceramic materials [5], composed of multiple metallic elements that form a highly disordered structure. This unique configuration imparts exceptional properties, including superior thermal stability, outstanding corrosion resistance, and excellent hardness and mechanical strength. In this study, one-dimensional high-entropy oxide nanofillers were synthesized and incorporated into epoxy resin to develop composite coatings. The objective is to fill micro-voids generated during the coating fabrication process, thereby achieving a composite coating with enhanced hardness and corrosion resistance, and subsequently investigating its anticorrosion performance.
2. Methods and Materials
2.1 Preparation of High-Entropy Oxide Y2(Ti0.2Zr0.2Hf0.2Ce0.2V0.2)2O7
The high-entropy oxide (HEO) was synthesized using the solid-state reaction method. The main preparation steps are as follows: oxide powders of the corresponding elements were weighed according to the designed chemical composition of the high-entropy oxide with a molar ratio of Y:T:Zr:Hf:Ce:V = 5:1:1:1:1:1. The powders were then mixed using a planetary ball mill for 12 hours. After milling, the resulting slurry was transferred into centrifuge tubes, centrifuged, and the lower precipitate was collected and dried in a vacuum oven for 8 hours. The dried mixture was subsequently ground and sieved through a 200-mesh sieve. The sieved powder was placed in an alumina crucible, compacted with a spatula, and sintered in a muffle furnace at 1000 °C for 4 hours. Finally, the sintered product was ground and passed through a 200-mesh sieve to obtain the high-entropy oxide filler (HEO).
2.2 Preparation of Composite Coatings
2g of epoxy resin was dissolved in 8mL of acetone, followed by the addition of 40mg of high-entropy oxide filler and ultrasonic dispersion for 15min. The slurry was then heated and stirred at 50°C to remove the acetone. Subsequently, 0.6g of curing agent T-31 was added, and the mixture was stirred at a constant speed for 15min. The coating was uniformly applied onto the pretreated 6061 aluminum alloy surface using a wire-wound rod coater with a wet film thickness of 200μm. The prepared samples were cured at room temperature for 2 days, followed by heating at 60°C for 4h, yielding an epoxy resin composite coating with a high-entropy oxide incorporation of 2wt%, designated as HEO-2.
Following the same procedure, composite coating samples with filler mass fractions of 1wt% and 3wt% were prepared and designated as HEO-1 and HEO-3, respectively. Additionally, a pure epoxy resin coating without any filler was fabricated and designated as EPa2 + b2 = c2 .
$$\left( x + a \right)^{n} = \sum_{k = 0}^{n}{\left( \frac{n}{k} \right)x^{n - k}a^{k}}$$
The morphological features of the EP, HEO-1, HEO-2, and HEO-3 samples were observed using scanning electron microscopy (SEM).
The electrochemical impedance spectroscopy (EIS) and polarization curves of the coatings were measured using an electrochemical workstation. EIS measurements were conducted at open-circuit potential over a frequency range from 100,000Hz to 0.01Hz, with an AC amplitude of 10mV. Polarization curves were recorded at a scan rate of 5mV/s. The corrosion inhibition efficiency [6] and impedance efficiency [7] of the coated samples were calculated using the following equations.
| (1) | ||
| (2) |
In Equation (1), P represents the corrosion inhibition efficiency, ji denotes the corrosion current density of the coated sample (A/cm²), and j0 is the corrosion current density of the blank sample (i.e., pure epoxy resin) (A/cm²).
In Equation (2), η represents the impedance efficiency, Ri denotes the impedance value of the coated sample (Ω/cm²), and R0 is the impedance value of the blank sample (Ω/cm²).
3. Results and Discussion
3.1 Microstructural Analysis
The morphologies of the EP, HEO-1, HEO-2, and HEO-3 samples were examined using scanning electron microscopy (SEM), as shown in Figure 1. Numerous large bubbles are present inside the EP sample (Figure 1a). This is attributed to the high viscosity of the pure epoxy system, which traps air during stirring, and the entrapped air is unable to escape easily. The bubble control in the HEO-1 sample (Figure 1b) is similar to that in EP, with a considerable number of bubbles observed. This is due to the insufficient filler content, which leads to limited dispersion in the resin and an inability to effectively suppress bubble formation during mixing and curing. The HEO-2 sample (Figure 1c) exhibits the fewest and smallest internal bubbles, with the most uniform and complete structure. This improvement is attributed to the optimal filler content, which moderates the viscosity of the coating, facilitates bubble escape, and suppresses bubble generation. The HEO-3 sample (Figure 1d) also demonstrates good bubble control but remains inferior to HEO-2. This is because the excessive filler addition increases slurry viscosity and reduces fluidity, hindering bubble removal and leading to partial bubble retention.
Figure 1. SEM images of the composite coating2:(a) EP; (b) HEO-1; (c) HEO-2; (d) HEO-3.
3.2 Polarization Curve Analysis
The polarization curves and corresponding data are presented in Figure 2 and Table 1. As shown in Figure 2 and Table 1, compared with the pure epoxy coating, the coatings containing HEO fillers exhibit a positive shift in corrosion potential and a decrease in corrosion current density, indicating improved anticorrosion performance. Among them, the HEO-2 coating shows a more positive corrosion potential and the lowest corrosion current density, demonstrating the highest anticorrosion efficiency. Even after prolonged exposure to the corrosive medium, the HEO-2 sample maintains excellent anticorrosion performance, suggesting that 2wt% HEO filler achieves good dispersion within the coating and effectively inhibits the penetration of corrosive species.
Figure 2. Polarization curves of samples with different coatings without immersion (a) and immersed for 10 days (b).
Table 1. Polarization curve fitting data of different coating samples.
| Coating sample | Immersion time/day | j /(A/cm-2) | E/V | P (%) |
| EP | 0 | 1.730×10⁻⁷ | -1.019 | - |
| 10 | 8.013×10⁻⁷ | -1.021 | - | |
| HEO-1 | 0 | 1.308×10⁻⁸ | -0.757 | 92.43 |
| 10 | 1.416×10⁻⁸ | -0.517 | 91.82 | |
| HEO-2 | 0 | 1.059×10⁻⁹ | -0.191 | 99.39 |
| 10 | 7.669×10⁻⁹ | -0.416 | 95.57 | |
| HEO-3 | 0 | 1.424×10⁻⁹ | -0.294 | 99.17 |
| 10 | 1.422×10⁻⁸ | -0.744 | 91.78 |
3.3 Electrochemical Impedance Analysis
The electrochemical impedance data are presented in Figure 3 and Table 2. Figure 3 and Table 2 clearly illustrate the performance differences among the coatings. Among the composite coatings, HEO-2 exhibits the highest impedance efficiency, reaching 98.63% initially and remaining at 91.75% after 10 days of immersion. Compared with the other samples, HEO-2 consistently shows the best impedance values and efficiency before and after immersion, indicating that the incorporation of 2wt% HEO provides superior anticorrosion performance, effectively protecting the substrate from corrosion and extending the coating service life. The HEO-1 coating demonstrates an initial impedance efficiency of 91.26%, which decreases significantly to 40.69% after 10 days of immersion. This suggests that 1wt% HEO is insufficient to notably enhance the corrosion protection capability of the coating. Combined with the SEM observations, it can be inferred that the low filler content leads to inadequate dispersion, resulting in limited reinforcement and modification effects. The HEO-3 coating shows an initial impedance efficiency of 96.71% and retains 90.62% after 10 days of immersion, indicating that 3wt% HEO significantly improves anticorrosion performance. However, compared with HEO-2, excessive filler addition leads to diminished efficiency gains and potential material waste, suggesting that 2wt% is the optimal loading for achieving balanced performance and economic efficiency.
Figure 3. Nyquist plot of samples with different coatings without immersion (a) and immersed for 10 days (b).
Table 2. Electrochemical impedance data of different coating samples.
| Coating sample | Immersion time/day | R/(Ω) | η(%) |
| EP | 0 | 8.653×10⁵ | - |
| 10 | 5.573×10⁵ | - | |
| HEO-1 | 0 | 9.902×10⁶ | 91.26 |
| 10 | 1.459×10⁶ | 40.69 | |
| HEO-2 | 0 | 6.324×10⁷ | 98.63 |
| 10 | 1.049×10⁷ | 91.75 | |
| HEO-3 | 0 | 2.637×10⁷ | 96.71 |
| 10 | 9.226×10⁶ | 90.62 |
3.4 Hydrophobicity Test
The water absorption data obtained by the gravimetric method are presented in Figure 4. As shown in Figure 4, the water absorption rates of the epoxy composite coatings containing HEO fillers are significantly lower than that of the pure epoxy coating, and the increase in water absorption over time is also much slower. This improvement is attributed to the incorporation of HEO fillers, which partially fill the micro-voids generated during the curing process of the epoxy matrix, resulting in a denser coating structure that effectively inhibits water penetration and enhances hydrophobic performance. Furthermore, the high hardness, excellent corrosion resistance, and outstanding chemical stability of HEO contribute to greater resistance against intrusion by corrosive molecules, thereby maintaining the structural integrity of the coating and further improving its hydrophobicity.
Figure 4. Water absorption of different coating samples after soaking for different time.
3.5 Anticorrosion Mechanism Analysis
The anticorrosion mechanism of the epoxy composite coating is illustrated in Figure 5. The corrosion protection primarily arises from the physical barrier effect provided by the anticorrosive fillers. Pure epoxy resin has high viscosity, which facilitates air entrapment during mixing with the curing agent, leading to the formation of micropore. In addition, solvent evaporation during epoxy curing also contributes to micropore formation. As shown in Figure 5(a), when corrosive species penetrate the coating, they can reach the metal substrate through these micropore, initiating corrosion reactions upon contact. Therefore, pure epoxy resin exhibits relatively poor corrosion resistance in electrochemical tests. Figure 5(b) presents the schematic diagram of the corrosion protection mechanism after incorporating HEO fillers. As an anticorrosive filler, HEO possesses high hardness, strong corrosion resistance, and excellent chemical stability owing to its lattice distortion effect, sluggish diffusion effect, and high-entropy effect. The appropriate addition of HEO not only suppresses bubble formation and fills the voids in the epoxy matrix, but also acts as a physical barrier, creating a “tortuous path” or “maze effect” that significantly delays the permeation of corrosive molecules toward the substrate.
Figure 5. Schematic diagram of corrosion resistance mechanism of composite coatings (a) pure epoxy resin coating (b) epoxy resin composite coating with HEO.
4. Conclusion
Electrochemical measurements demonstrated that the HEO-2 coating exhibits excellent corrosion resistance. Before immersion, the corrosion protection efficiency reached 99.39%. After immersion in 3.5wt% NaCl solution for 10 days, the coating retained a high protection efficiency of 95.57%. The impedance efficiency obtained from the Nyquist plots was 98.63%, and remained at 91.75% after 10 days of immersion.
Hydrophobicity tests further confirmed that the HEO-2 epoxy composite coating possesses outstanding water-repellent properties. The initial water absorption rate was 2.37%, and only slightly increased to 2.72% after 10 days of immersion in 3.5wt% NaCl solution, indicating that the HEO-2 composite coating has a denser microstructure, resulting in improved hydrophobicity and enhanced corrosion protection.
As a high-entropy oxide, Y2(Ti0.2Zr0.2Hf0.2Ce0.2V0.2)2O7 exhibits excellent structural stability, high hardness, and superior corrosion resistance. Its incorporation into the epoxy matrix significantly enhances the anticorrosion performance of the composite coating. The combination of inorganic fillers with organic coatings represents an important research direction for advanced protective coatings, offering broad application prospects and warranting further investigation.
References
-
McMahon Matthew E, Santucci Raymond J. Jr, Glover Carol F, Kannan Balaji, Walsh Zachery R, Scully John R (2019) A Review of Modern Assessment Methods for Metal and Metal-Oxide Based Primers for Substrate Corrosion Protection. Frontiers in Materials.,6:190.
-
Sepideh P, Ebrahim G, Alimorad R, Mohammad R V (2018) Corrosion protection properties of novel epoxy nanocomposite coatings containing silane functionalized graphene quantum dot. Journal of Alloys and Compounds.,731:1112-1118.
-
H Liu, A Tang, W Xu, et al. (2025) Effect of carbon-based filler dimensions on the anti-corrosion performance for epoxy composite coating. Inorganic Chemistry Communications., 180(1): 114913.
-
Y Li, S Liu, F Feng, et al. (2024) Preparation and Characterization of Graphene Oxide/Carbon Nanotube/Polyaniline Composite and Conductive and Anticorrosive Properties of Its Waterborne Epoxy Composite Coatings. Polymers., 16(18): 264.
-
Almishal S.S.I, Furst M, Tan Y, et al. (2025) Thermodynamics-inspired high-entropy oxide synthesis. Nat Commun.16: 8211.
-
J Chen, X Li, et al. (2024) Influence of corrosion inhibitors on aging mechanism of epoxy resin coatings for copper 62 alloy in simulated marine environment. Corrosion Reviews., 43(4):457-467.
-
Gata Joseph A. (2023) Methodology for development of smart epoxy coatings incorporated with Ethylenediamine-N, N'-disuccinic ac-id (EDDS) layered double hydroxides (LDHs) for corrosion protection of XC38 carbon steel. Materials. INSA de Lyon.
Investigation on the corrosion resistance of epoxy resin coatings modified by high-entropy oxides
Investigation on the corrosion resistance of epoxy resin coatings modified by high-entropy oxides
Boxin Yan1, Chao Wang1,2, Yihui Liu1
1Hubei Key Laboratory of Advanced Technology for Automotive Components & Hubei Collaborative Innovation Center for Automotive Components Technology, Wuhan University of Technology, Wuhan, Hubei, 430070, China
2Corresponding author’s e-mail: wchao@whut.edu.cn
Abstract: High-entropy oxides, as an emerging class of ceramic materials, exhibit exceptional high-temperature stability, superior corrosion resistance, and excellent hardness and strength, rendering them promising candidates for surface protection applications. In this study, high-entropy oxide filler Y2(Ti0.2Zr0.2Hf0.2Ce0.2V0.2)2O7 was synthesized via solid-state reaction and incorporated as a nanofiller to modify epoxy resin, thereby fabricating composite coatings. The influence of varying high-entropy oxide contents on the anticorrosion performance of the composite coatings was systematically investigated, and the underlying corrosion protection mechanism of the high-entropy oxide-modified epoxy coatings was elucidated. The results demonstrate that the composite coatings incorporating high-entropy oxide exhibit outstanding anticorrosion properties, with a corrosion inhibition efficiency of 99.39% derived from polarization curve analysis. Even after immersion in 3.5wt% NaCl solution for 10 days, the corrosion inhibition efficiency remained at 95.57%. Impedance efficiency, as determined from Nyquist plots, reached 98.63%, and retained 91.75% after 10 days of immersion.
1. Introduction测试
Metallic materials play a crucial role in industrial development. Their corrosion not only affects the national economy and personal safety, but also poses significant environmental impacts. Among existing strategies, applying protective coatings on metal surfaces is currently one of the most widely used and effective corrosion-prevention approaches [1]. However, traditional organic coatings often fail to meet the demands of modern industry, and the incorporation of functional anticorrosive fillers has proven to be an effective method to enhance coating performance [2].
One-dimensional nanomaterials exhibit size-dependent effects [3] and barrier properties, which can effectively improve the performance of epoxy coatings by mitigating microcracks and voids formed during the curing process [4]. High-entropy oxides represent a novel class of ceramic materials [5], composed of multiple metallic elements that form a highly disordered structure. This unique configuration imparts exceptional properties, including superior thermal stability, outstanding corrosion resistance, and excellent hardness and mechanical strength. In this study, one-dimensional high-entropy oxide nanofillers were synthesized and incorporated into epoxy resin to develop composite coatings. The objective is to fill micro-voids generated during the coating fabrication process, thereby achieving a composite coating with enhanced hardness and corrosion resistance, and subsequently investigating its anticorrosion performance.
2. Methods and Materials
2.1 Preparation of High-Entropy Oxide Y2(Ti0.2Zr0.2Hf0.2Ce0.2V0.2)2O7
The high-entropy oxide (HEO) was synthesized using the solid-state reaction method. The main preparation steps are as follows: oxide powders of the corresponding elements were weighed according to the designed chemical composition of the high-entropy oxide with a molar ratio of Y:T:Zr:Hf:Ce:V = 5:1:1:1:1:1. The powders were then mixed using a planetary ball mill for 12 hours. After milling, the resulting slurry was transferred into centrifuge tubes, centrifuged, and the lower precipitate was collected and dried in a vacuum oven for 8 hours. The dried mixture was subsequently ground and sieved through a 200-mesh sieve. The sieved powder was placed in an alumina crucible, compacted with a spatula, and sintered in a muffle furnace at 1000 °C for 4 hours. Finally, the sintered product was ground and passed through a 200-mesh sieve to obtain the high-entropy oxide filler (HEO).
2.2 Preparation of Composite Coatings
2g of epoxy resin was dissolved in 8mL of acetone, followed by the addition of 40mg of high-entropy oxide filler and ultrasonic dispersion for 15min. The slurry was then heated and stirred at 50°C to remove the acetone. Subsequently, 0.6g of curing agent T-31 was added, and the mixture was stirred at a constant speed for 15min. The coating was uniformly applied onto the pretreated 6061 aluminum alloy surface using a wire-wound rod coater with a wet film thickness of 200μm. The prepared samples were cured at room temperature for 2 days, followed by heating at 60°C for 4h, yielding an epoxy resin composite coating with a high-entropy oxide incorporation of 2wt%, designated as HEO-2.
Following the same procedure, composite coating samples with filler mass fractions of 1wt% and 3wt% were prepared and designated as HEO-1 and HEO-3, respectively. Additionally, a pure epoxy resin coating without any filler was fabricated and designated as EPa2 + b2 = c2 .
$$\left( x + a \right)^{n} = \sum_{k = 0}^{n}{\left( \frac{n}{k} \right)x^{n - k}a^{k}}$$ $$\sum_{i=1}^n i = \frac{n(n+1)}{2}$$ $$ \begin{pmatrix} 1 & 2 & 3 \\ 4 & 5 & 6 \\ 7 & 8 & 9 \end{pmatrix} $$ $$ \begin{cases} 2x + y = 5 \\ x - y = 1 \end{cases} $$
The morphological features of the EP, HEO-1, HEO-2, and HEO-3 samples were observed using scanning electron microscopy (SEM).
The electrochemical impedance spectroscopy (EIS) and polarization curves of the coatings were measured using an electrochemical workstation. EIS measurements were conducted at open-circuit potential over a frequency range from 100,000Hz to 0.01Hz, with an AC amplitude of 10mV. Polarization curves were recorded at a scan rate of 5mV/s. The corrosion inhibition efficiency [6] and impedance efficiency [7] of the coated samples were calculated using the following equations.
| (1) | ||
| (2) |
In Equation (1), P represents the corrosion inhibition efficiency, ji denotes the corrosion current density of the coated sample (A/cm²), and j0 is the corrosion current density of the blank sample (i.e., pure epoxy resin) (A/cm²).
In Equation (2), η represents the impedance efficiency, Ri denotes the impedance value of the coated sample (Ω/cm²), and R0 is the impedance value of the blank sample (Ω/cm²).
3. Results and Discussion
3.1 Microstructural Analysis
The morphologies of the EP, HEO-1, HEO-2, and HEO-3 samples were examined using scanning electron microscopy (SEM), as shown in Figure 1. Numerous large bubbles are present inside the EP sample (Figure 1a). This is attributed to the high viscosity of the pure epoxy system, which traps air during stirring, and the entrapped air is unable to escape easily. The bubble control in the HEO-1 sample (Figure 1b) is similar to that in EP, with a considerable number of bubbles observed. This is due to the insufficient filler content, which leads to limited dispersion in the resin and an inability to effectively suppress bubble formation during mixing and curing. The HEO-2 sample (Figure 1c) exhibits the fewest and smallest internal bubbles, with the most uniform and complete structure. This improvement is attributed to the optimal filler content, which moderates the viscosity of the coating, facilitates bubble escape, and suppresses bubble generation. The HEO-3 sample (Figure 1d) also demonstrates good bubble control but remains inferior to HEO-2. This is because the excessive filler addition increases slurry viscosity and reduces fluidity, hindering bubble removal and leading to partial bubble retention.

Figure 1. SEM images of the composite coating2:(a) EP; (b) HEO-1; (c) HEO-2; (d) HEO-3.
3.2 Polarization Curve Analysis
The polarization curves and corresponding data are presented in Figure 2 and Table 1. As shown in Figure 2 and Table 1, compared with the pure epoxy coating, the coatings containing HEO fillers exhibit a positive shift in corrosion potential and a decrease in corrosion current density, indicating improved anticorrosion performance. Among them, the HEO-2 coating shows a more positive corrosion potential and the lowest corrosion current density, demonstrating the highest anticorrosion efficiency. Even after prolonged exposure to the corrosive medium, the HEO-2 sample maintains excellent anticorrosion performance, suggesting that 2wt% HEO filler achieves good dispersion within the coating and effectively inhibits the penetration of corrosive species.

Figure 2. Polarization curves of samples with different coatings without immersion (a) and immersed for 10 days (b).
Table 1. Polarization curve fitting data of different coating samples.
| Coating sample | Immersion time/day | j /(A/cm-2) | E/V | P (%) |
| EP | 0 | 1.730×10⁻⁷ | -1.019 | - |
| 10 | 8.013×10⁻⁷ | -1.021 | - | |
| HEO-1 | 0 | 1.308×10⁻⁸ | -0.757 | 92.43 |
| 10 | 1.416×10⁻⁸ | -0.517 | 91.82 | |
| HEO-2 | 0 | 1.059×10⁻⁹ | -0.191 | 99.39 |
| 10 | 7.669×10⁻⁹ | -0.416 | 95.57 | |
| HEO-3 | 0 | 1.424×10⁻⁹ | -0.294 | 99.17 |
| 10 | 1.422×10⁻⁸ | -0.744 | 91.78 |
3.3 Electrochemical Impedance Analysis
3.3 Electrochemical Impedance Analysis
The electrochemical impedance data are presented in Figure 3 and Table 2. Figure 3 and Table 2 clearly illustrate the performance differences among the coatings. Among the composite coatings, HEO-2 exhibits the highest impedance efficiency, reaching 98.63% initially and remaining at 91.75% after 10 days of immersion. Compared with the other samples, HEO-2 consistently shows the best impedance values and efficiency before and after immersion, indicating that the incorporation of 2wt% HEO provides superior anticorrosion performance, effectively protecting the substrate from corrosion and extending the coating service life. The HEO-1 coating demonstrates an initial impedance efficiency of 91.26%, which decreases significantly to 40.69% after 10 days of immersion. This suggests that 1wt% HEO is insufficient to notably enhance the corrosion protection capability of the coating. Combined with the SEM observations, it can be inferred that the low filler content leads to inadequate dispersion, resulting in limited reinforcement and modification effects. The HEO-3 coating shows an initial impedance efficiency of 96.71% and retains 90.62% after 10 days of immersion, indicating that 3wt% HEO significantly improves anticorrosion performance. However, compared with HEO-2, excessive filler addition leads to diminished efficiency gains and potential material waste, suggesting that 2wt% is the optimal loading for achieving balanced performance and economic efficiency.

Figure 3. Nyquist plot of samples with different coatings without immersion (a) and immersed for 10 days (b).
Table 2. Electrochemical impedance data of different coating samples.
| Coating sample | Immersion time/day | R/(Ω) | η(%) |
| EP | 0 | 8.653×10⁵ | - |
| 10 | 5.573×10⁵ | - | |
| HEO-1 | 0 | 9.902×10⁶ | 91.26 |
| 10 | 1.459×10⁶ | 40.69 | |
| HEO-2 | 0 | 6.324×10⁷ | 98.63 |
| 10 | 1.049×10⁷ | 91.75 | |
| HEO-3 | 0 | 2.637×10⁷ | 96.71 |
| 10 | 9.226×10⁶ | 90.62 |
3.4 Hydrophobicity Test
The water absorption data obtained by the gravimetric method are presented in Figure 4. As shown in Figure 4, the water absorption rates of the epoxy composite coatings containing HEO fillers are significantly lower than that of the pure epoxy coating, and the increase in water absorption over time is also much slower. This improvement is attributed to the incorporation of HEO fillers, which partially fill the micro-voids generated during the curing process of the epoxy matrix, resulting in a denser coating structure that effectively inhibits water penetration and enhances hydrophobic performance. Furthermore, the high hardness, excellent corrosion resistance, and outstanding chemical stability of HEO contribute to greater resistance against intrusion by corrosive molecules, thereby maintaining the structural integrity of the coating and further improving its hydrophobicity.

Figure 4. Water absorption of different coating samples after soaking for different time.
3.5 Anticorrosion Mechanism Analysis
The anticorrosion mechanism of the epoxy composite coating is illustrated in Figure 5. The corrosion protection primarily arises from the physical barrier effect provided by the anticorrosive fillers. Pure epoxy resin has high viscosity, which facilitates air entrapment during mixing with the curing agent, leading to the formation of micropore. In addition, solvent evaporation during epoxy curing also contributes to micropore formation. As shown in Figure 5(a), when corrosive species penetrate the coating, they can reach the metal substrate through these micropore, initiating corrosion reactions upon contact. Therefore, pure epoxy resin exhibits relatively poor corrosion resistance in electrochemical tests. Figure 5(b) presents the schematic diagram of the corrosion protection mechanism after incorporating HEO fillers. As an anticorrosive filler, HEO possesses high hardness, strong corrosion resistance, and excellent chemical stability owing to its lattice distortion effect, sluggish diffusion effect, and high-entropy effect. The appropriate addition of HEO not only suppresses bubble formation and fills the voids in the epoxy matrix, but also acts as a physical barrier, creating a “tortuous path” or “maze effect” that significantly delays the permeation of corrosive molecules toward the substrate.

Figure 5. Schematic diagram of corrosion resistance mechanism of composite coatings (a) pure epoxy resin coating (b) epoxy resin composite coating with HEO.
4. Conclusion
Electrochemical measurements demonstrated that the HEO-2 coating exhibits excellent corrosion resistance. Before immersion, the corrosion protection efficiency reached 99.39%. After immersion in 3.5wt% NaCl solution for 10 days, the coating retained a high protection efficiency of 95.57%. The impedance efficiency obtained from the Nyquist plots was 98.63%, and remained at 91.75% after 10 days of immersion.
Hydrophobicity tests further confirmed that the HEO-2 epoxy composite coating possesses outstanding water-repellent properties. The initial water absorption rate was 2.37%, and only slightly increased to 2.72% after 10 days of immersion in 3.5wt% NaCl solution, indicating that the HEO-2 composite coating has a denser microstructure, resulting in improved hydrophobicity and enhanced corrosion protection.
As a high-entropy oxide, Y2(Ti0.2Zr0.2Hf0.2Ce0.2V0.2)2O7 exhibits excellent structural stability, high hardness, and superior corrosion resistance. Its incorporation into the epoxy matrix significantly enhances the anticorrosion performance of the composite coating. The combination of inorganic fillers with organic coatings represents an important research direction for advanced protective coatings, offering broad application prospects and warranting further investigation.
References
-
McMahon Matthew E, Santucci Raymond J. Jr, Glover Carol F, Kannan Balaji, Walsh Zachery R, Scully John R (2019) A Review of Modern Assessment Methods for Metal and Metal-Oxide Based Primers for Substrate Corrosion Protection. Frontiers in Materials.,6:190.
-
Sepideh P, Ebrahim G, Alimorad R, Mohammad R V (2018) Corrosion protection properties of novel epoxy nanocomposite coatings containing silane functionalized graphene quantum dot. Journal of Alloys and Compounds.,731:1112-1118.
-
H Liu, A Tang, W Xu, et al. (2025) Effect of carbon-based filler dimensions on the anti-corrosion performance for epoxy composite coating. Inorganic Chemistry Communications., 180(1): 114913.
-
Y Li, S Liu, F Feng, et al. (2024) Preparation and Characterization of Graphene Oxide/Carbon Nanotube/Polyaniline Composite and Conductive and Anticorrosive Properties of Its Waterborne Epoxy Composite Coatings. Polymers., 16(18): 264.
-
Almishal S.S.I, Furst M, Tan Y, et al. (2025) Thermodynamics-inspired high-entropy oxide synthesis. Nat Commun.16: 8211.
-
J Chen, X Li, et al. (2024) Influence of corrosion inhibitors on aging mechanism of epoxy resin coatings for copper 62 alloy in simulated marine environment. Corrosion Reviews., 43(4):457-467.
-
Gata Joseph A. (2023) Methodology for development of smart epoxy coatings incorporated with Ethylenediamine-N, N'-disuccinic ac-id (EDDS) layered double hydroxides (LDHs) for corrosion protection of XC38 carbon steel. Materials. INSA de Lyon.
test页面
示例文档
这是一个从Word文档转换而来的Markdown示例。
章节标题
- 列表项1
- 列表项2
- 列表项3
子章节
数学公式:$E = mc^2$
矩阵示例:
$$
\begin{pmatrix}
1 & 2 & 3
4 & 5 & 6
7 & 8 & 9
\end{pmatrix}
$$
$$
\begin{pmatrix}
1 & 2 & 3 \\
4 & 5 & 6 \\
7 & 8 & 9
\end{pmatrix}
$$
粗体文本 和 斜体文本。
图片示例: